They're gooooing to the chapel, and they're gooooonna get ma-a-a-rried (that's embarrassing, I'm not even a good singer in print). Not the point. MY BROTHER IS GETTING MARRIED!!! THAT is the point. And a totally legit reason to use all caps, which in general I usually have a burning hatred for (more so their completely inappropriate or unnecessary use).
Anyway, my brother and his gorgeous fiancée Natalie got engaged a couple weeks ago.
 |
| This is them! Lovely. |
Once we were settled back into the house, we rescheduled the party. Unfortunately, my little bro had to return home to Australia while we were still evacuated, but he will get to go to the party down under when they return home.
Planning this cake was simple, since both the bride and the groom had special requests. The groom wanted carrot cake (our secret family recipe, which will also make an appearance at their wedding), and the bride wanted chocolate cake pops. She also already knew what colors she wanted for her party. Planning done. Sweet.
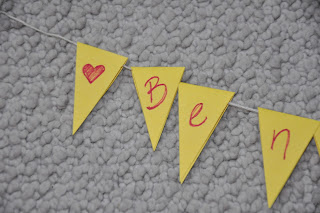
For the carrot cake, I went with a super simple rustic (read: messy) frosting look, with festive paper bunting in the party colors. Cream cheese frosting, in case you were wondering. Obviously.
 |
| Look what I got for my birthday!! Not the half-frosted carrot cake, the turntable. Yay! |
Like this (please excuse the fact that I craft on the floor, and that I clearly did not have time to take half-way decent pictures).
And then lined them up on string. And then glued the ends together.
And then drew on the lettering.
And then tied the ends to skewers, and stuck the skewers into the cake.
For the cake pops, I made the same chocolate cake that I made for these. They turned out great last time, and who am I to mess with a good thing? Since I made a boatload of cream cheese frosting for the carrot cake, resulting in massive amounts of excess (no accident, my friends), I used cream cheese frosting again for these cake pops. Plus it's the best way. Honestly people, I would eat cream cheese frosting for breakfast, lunch, and dinner were it socially acceptable. With a side of Butterbeer Cupcake Frosting. But I digress.
Cake Pops.
Right.
The basics for making the cake pops are the same as I explained here, when I made these.
Except this time, all of the pops were round. I tried to make them roughly the same size, but I am apparently challenged in that arena. Like, to the point of being comical. I rolled, oh, I don't know, 40 of these, and then stepped back to admire my handiwork, and promptly noticed that they definitely increased in size from the first one to the last one. And there were a few in there that had no relation to the sizes around them whatsoever. While the uniformity of cake pop size is not super high on the Really Big Deal priority list, I had time to fix it, so I rerolled a bunch of them until they were all mostly the same. Still not perfect, but who is, right? (This is where you all say "you are!" and I blush and say "Gee Whiz you guys, you're too much..." No? Fine, whatever.)
Here they are. In all their glory.
Anyway, now that we have cake balls in 40 different sizes, it was time to make the ball-to-pop transition. It's easier than you think, and (hold your applause...) not a single cake pop fell off its stick. Not. A. Single. One. OK, you can clap now.
So I melted, dipped, stuck the balls on sticks, refrigerated, melted, dipped, set, aaaaand decorated. And repeated. And repeated. And ate sickening amounts of frosting and melted white chocolate. And then realized I was done. And danced. But then realized I didn't make the bunting for the other cake yet and stopped dancing. And then fended off the vultures (my family, who apparently all thought they needed to test the cake pops before the party).
Here's what I did. To tie in the colors, I made colored pops with white sprinkles, colored pops with white stripes, and white pops with colored stripes.
In the interests of full disclosure, I must admit that even I am astonished at the mess being made (and the mess that was already in full force) in the next picture. But it's fun to see how it all works. Here is the be-striping (totally a word) of one of the yellow cake pops. Super simple. Just drizzle white chocolate melts back and forth over a dipped colored cake pop. Just be sure to keep moving the whole time or the stripes will be chunky or crooked.
These colorful pops were very fun and festive. They would be great for any kind of celebration, and the colors are soooo easy to customize.
The party was really fun, and we are thrilled to officially be welcoming Nat into our family. Stay tuned for their wedding cake in 2014!


No comments:
Post a Comment