Tuesday, December 24, 2013

Christmas Cupcakes - Chocolate Peppermint Swirl, Holiday Spice with Eggnog Buttercream

So I'm not actually sure that Christmas cupcakes are a "thing."

Most people go with cookies, seasonal breads, or chocolates. But I like cake, y'all. Now cookies, candies, and breads, don't go getting all offended now, I love you too, but this year cake (cupcakes to be exact) won out as the gift of choice.  I made these for my colleagues and some friends, and they seemed to be a pretty solid success. I used a couple tried and true cake recipes for the cupcakes, and tweaked the buttercream to make these fit for consumption between Thanksgiving and New Year's.

Above, legions of cupcakes waiting to receive their frosting. If I wouldn't be mortified to show you what my kitchen looks like at this stage of the process, you could see that every surface that wasn't covered with sugar, frosting, piping tips, flour, and other such paraphernalia was covered with more cupcakes. Seriously. I made like 800 of these things. Well, maybe more like 160. But still. Lots.

As often happens, I couldn't choose between two flavors, and I don't believe my recipients should have to either, so I made both. Chocolate cupcakes with peppermint swirl buttercream, and Holiday Spice (which is totally just normal spice cake, but if you say holiday spice it makes people feel all Christmas-y and stuff) with eggnog buttercream. Both are simple to make (the piping of the peppermint frosting was the trickiest part) and so yummy. And making them in minis is good for the holiday season, where they will no doubt be sharing the dessert spotlight with numerous other treats vying for real estate in your stomach.

Whip some up this holiday season (or whenever really, it's not like peppermint is exclusive to Christmas, despite what Starbucks would have you believe), and enjoy time with family and friends.


********************
Chocolate Mini Cupcakes 
with Peppermint Swirl Buttercream
You can see my instructions here; it's the same chocolate cake I use to make cake pops.

Ingredients
2 cups flour
2 cups sugar
1/4 teaspoon salt
4 heaping tablespoons cocoa
2 sticks butter
1 cup boiling water
1/2 cup buttermilk
2 whole beaten eggs
1 teaspoon baking soda
1 teaspoon vanilla

Directions
Preheat oven to 350°
In a mixing bowl, combine the flour, sugar, and salt.In a saucepan, melt the butter. When butter is completely melted, add the cocoa.When butter and cocoa is well mixed, add the boiling water. Stir well. Allow this mixture to boil for 30 seconds, and then pull off the heat.
Pour the chocolate mixture into the flour mixture in the mixing bowl.Mix gently to let the mixture cool.In a separate measuring cup, combine the buttermilk, the beaten eggs, the vanilla, and the baking soda.Add the buttermilk mixture to the mixing bowl and mix until incorporated.
Spoon into mini baking cups (a little over half full) in a mini muffin pan. 
Bake 8-10 minutes or until toothpick comes out clean. Be careful, these are very easy to overbake as they are so tiny!


Peppermint Buttercream frosting

Ingredients

2 sticks (1/2 lb) unsalted butter
4-6 cups confectioner's sugar (more sugar means a stiffer frosting)
1/4 teaspoon salt
2-3 tablespoons heavy cream
2 teaspoons vanilla extract
1-3 teaspoons peppermint extract (to taste, this can be strong for some people)
red food color

Directions

In the large bowl of a mixer, with a paddle attachment, beat the butter for about 3 minutes.
Gradually add the sugar, 1 cup at a time, beating well after each addition. If you don't beat it in between, the frosting might end up grainy.
Add salt during one of the sugar additions.
Add two tablespoons of cream and vanilla, and beat well. Add cream to reach desired consistency (stiffer is better for piping).
Separate the frosting into halves in two bowls. To one bowl, add red food color until you reach the desired color (peppermint red). Add peppermint extract to red frosting 1/2 teaspoon at a time, tasting in between additions.
You could of course make all the frosting peppermint, or make the white peppermint, but I chose to make the red peppermint, and it's fun to have it swirled in with the white, which is still regular vanilla.


To pipe the swirled frosting, I made two small bags (12") filled with the red frosting, and two small bags filled with the white frosting. 


Snip the tips off all four bags, then slide them down into a large bag (at least 16") fitted with a piping tip (I used a Wilton 2D), ensuring that the openings of each small bag are all lined up as close as possible.


Then all you have to do is pipe away! It can be tricky to get it flowing at first (since you're working four bags at once), but as it warms up in your hands it will move smoothly. 


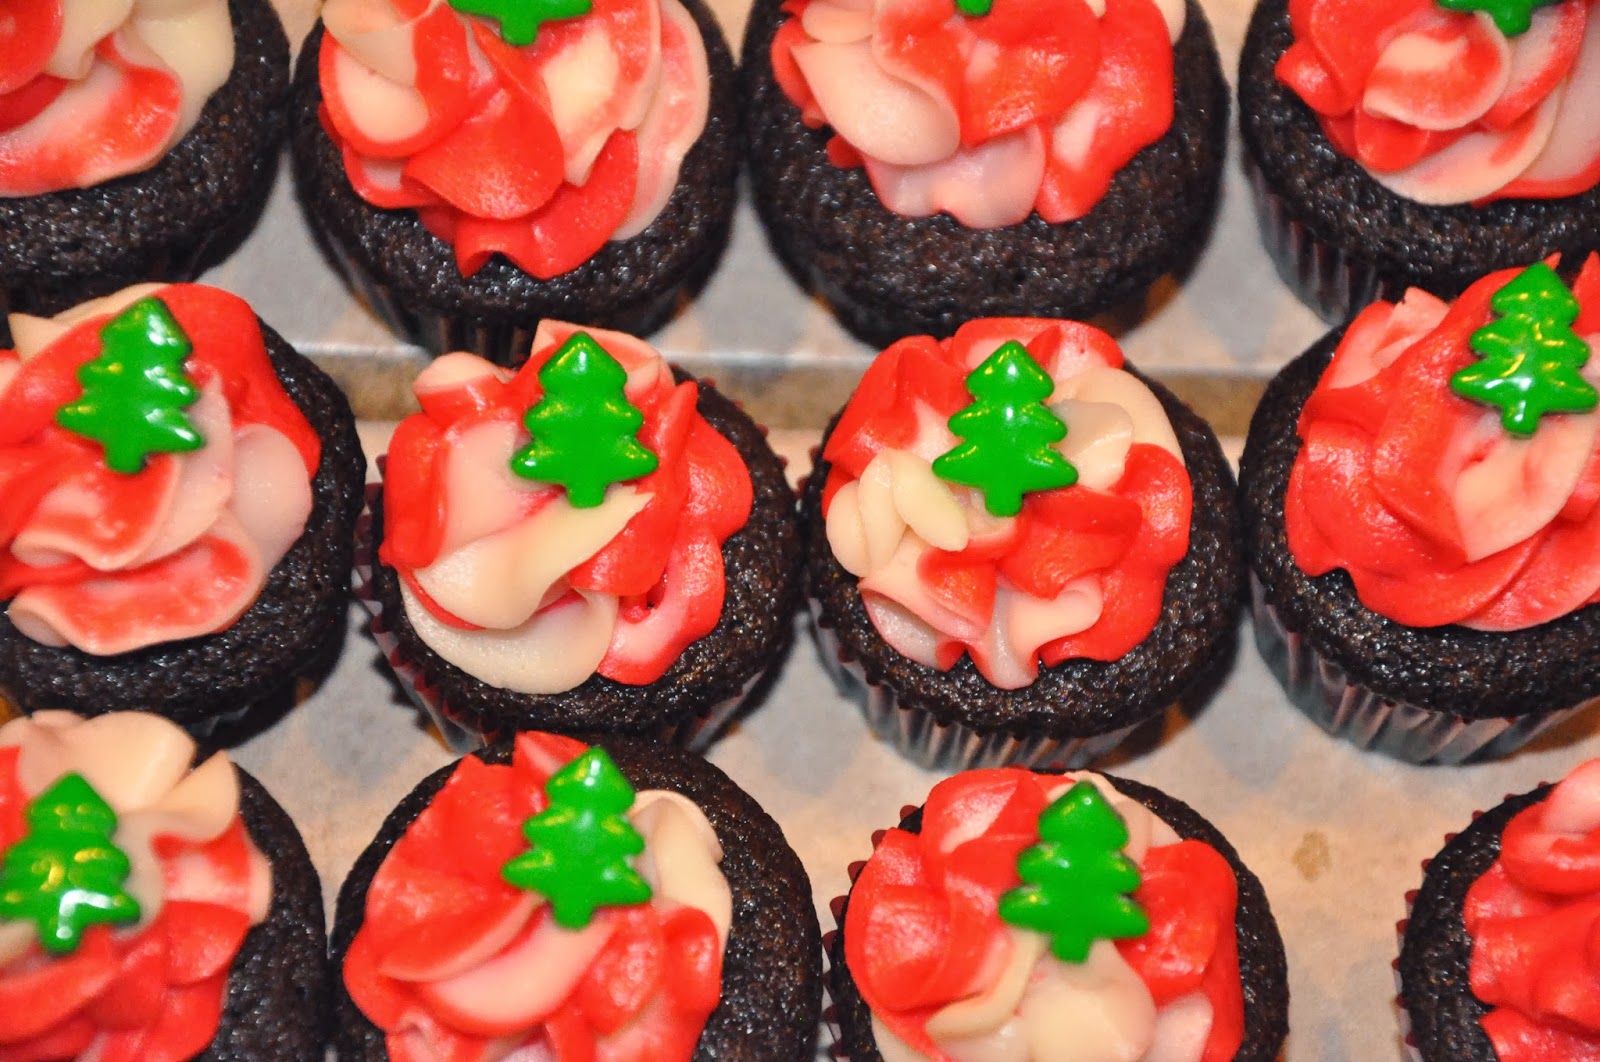
 They would be cute left like this, but I found these adorable candies at Williams Sonoma this year, and the little green trees look perfect perched on top of the swirly frosting.


********************


Holiday Spice Cupcakes with Eggnog Buttercream

Ingredients
2 1/2 cups flour
1 teaspoon baking powder
1 teaspoon baking soda
1 teaspoon salt
1 teaspoon ground cinnamon
1/2 teaspoon groung ginger
1/4 teaspoon ground nutmeg
1/4 teaspoon ground cloves
1/2 cup butter
1/2 cup brown sugar, firmly packed
1 cup granulated sugar
2 large eggs
1 teaspoon vanilla extract
1 1/4 cups buttermilk

Directions
Preheat oven to 350ºF.
Sift together the flour, baking powder, baking soda, salt, and spices. 
Cream butter in the bowl of your mixer. Add sugars, eggs, and vanilla. Beat at high speed for 4-5 minutes, or until the mixture becomes light and fluffy, scraping often.
Add dry ingredients alternately with buttermilk, using lowest speed of mixer (to avoid overmixing) until just combined.
Spoon into mini cupcake papers (a little over half full) in a mini muffin tin.
Bake 8-10 minutes (or until toothpick comes out clean). Be careful not to overbake these -  it's very easy to do, since they are so tiny.

Eggnog Buttercream


Ingredients

2 sticks (1/2 lb) unsalted butter
4-6 cups confectioner's sugar (more sugar means a stiffer frosting)
1/4 teaspoon salt
2-3 tablespoons heavy cream
2 teaspoons vanilla extract
3-6 tablespoons eggnog (to taste)...you could make your own, but I use store bought. It's yummy and it saves a ton of time
1/2 - 1 teaspoon ground cinnamon, plus extra for garnish

Directions
In the large bowl of a mixer, with a paddle attachment, beat the butter for about 3 minutes.
Gradually add the sugar, 1 cup at a time, beating well after each addition. If you don't beat it in between, the frosting might end up grainy.
Add salt during one of the sugar additions.
Add two tablespoons of cream and vanilla, and beat well. Add cream until just stiffer than desired consistency (stiffer is better for piping).

Add eggnog a tablespoon at a time until the taste is to your liking.


Pipe the frosting on using any tip you like (or heck, spread it on with a knife, dip 'em in there like chips and salsa, or smear it on with your fingers. Just try not to eat it all before it makes it to the cupcakes. It's good). I used a Wilton 1M, and managed to mostly pipe it onto cupcakes instead of directly into my mouth.
Sprinkle cinnamon onto the finished product. This is so pretty all by itself, but I did add some snowflake sprinkles to some of them, just to be extra festive.


 Here they are all packaged up ready to be delivered to work friends. These are fun, festive, and yummy. And easy, which means you can focus more time on friends, and family. After all, that's what's truly important. Much love, joy, and happiness for a wonderful Christmas and a happy New Year!

Saturday, September 7, 2013

A Girly Cake for a Baby Girl


Sugar and spice and everything nice. That is what little girls are made of.

Cake too. Especially when the top tier is spice cake, and the other two are white with raspberry and chocolate with more raspberry. And dark chocolate ganache. Smothered in cream cheese frosting and almond buttercream respectively.

This is one of my favorite cakes I have made. Ever. Like ever ever.

Why? Because of my emotional connection to it, and because of this:


And this:


And how the whole thing came together as a whole.

My best friend just became a Mommy for the first time this summer. We threw her a girly pink shower this spring, and I made this cake (duh). We wanted it to be cutesy but not kitschy, pink, but subtle, and mouthwateringly scrumptious. This was one of those designs that kind of percolated in the back of my mind for a couple weeks before all of a sudden becoming glaringly obvious as the perfect idea, and for once, execution almost identically matched my expectations.

The new Daddy-to-be's favorite cake is spice, so we made the little top tier spice cake (with cream cheese frosting) for him - it was set aside at the shower, and was taken home to be eaten later (since this was a traditional no-boys-allowed kind of shower). The other two tiers were those always crowd-pleasing white with raspberry filling and almond buttercream, and chocolate with raspberry and bittersweet ganache filling (also with almond buttercream).

Here they are all ready to be stacked and decorated. Spice cake front and center, and white and chocolate right behind.

The ombré look was pulled off with a combination of roses and fondant. The top and bottom layers were smothered in simple piped frosting roses (the "cheating" kind that I posted about a while back). The roses faded from a pretty pink at the bottom to white at the top (OK, almost white, but I was plumb out of clear vanilla extract).

The striped fondant tier in the middle was made to match the middle pink tone of the ombré for a continuous look top to bottom (or bottom to top...glass half full? The chicken or the egg?). The fondant tier was simple too. I made my homemade marshmallow fondant, first in white to cover the tier (which was, of course, frosted lightly to give the fondant something to cling to).


Then I mixed in some pink food coloring until it matched the pink I was going for, rolled it out, used a ruler and a pizza cutter to make the stripes, and "glued" them to the cake with a tiny bit of water.


When I was laying the stripes on the cake, I started on the top of the tier (not all the way to the center, since another tier was going to sit on top of it), and glued them down the sides before cutting off the excess even with the bottom of the tier. To space them evenly, do one, then another on the opposite side of the cake, and then do the ones halfway between those, etc. If you do one, and then another right next to it, and so on around the cake, you are likely to end up with too much or too little space when you get back to where you started.

For some cakes, I would decorate the tiers separately to avoid damaging finished tiers in the process. However, since this cake would be finished on the morning of the shower and the roses are pretty easy to smoosh (totally a word, even if spellcheck doesn't think so), I stacked it before I piped on the roses. The fondant tier was the only one completely finished before stacking. The others were only crumb-coated.

I loved the finished product. Still do. It was so so pretty and so so yummy. It will be hard to beat in the future.


This fun cake was a fun way to celebrate the imminent arrival of a sweet baby girl. Now that she is here, I am madly in love with her, and I am thrilled to be her "Auntie Katira."
Here we are on the fourth of July (2 weeks after she joined us in the world). Her outfit even matches her cake (that I'm sure she enjoyed in-utero)!


Thursday, August 15, 2013

Lemon Cupcakes and a 60th Wedding Anniversary


60 years is 21,900 days, which is 525,600 hours, which is 31,536,000 minutes, which is 1,892,160,000 seconds. Roughly. And that is how many seconds my grandparents have been married. They have been in love for even longer than that.

On August 15th, 1953, two people committed their lives to one another, and now, 60 years, 6 children, 29 grandchildren, and 1 great-grandchild later, they are still madly in love, and a great inspiration to us all.


A small portion of this family (the ones that could get time off work and who don't live scattered across the planet) gathered a couple weeks ago to surprise my wonderful grandparents in a celebration of their love. Their children took them to dinner, and while they were there, a small group of my cousins and I set out desserts and a couple decorations for when they returned. It was the last in a string of surprises that week, including spontaneous visitors and world travelers. Good times were had by all.


Enjoying cake at their wedding...

...and cupcakes at their 60th.

I made these lemon cupcakes as a sweet summer treat, in a cheerful, festive hue, bedecked with (all together with me now) cream cheese frosting. And plus, have you seen these Paper Eskimo cups yet? Holy cuteness! Like 12 on a scale of 1-10, if cupcake papers had a cuteness scale.


See? Holy moly.

These lemon cupcakes are easy to make, delicious and tangy and moist, and can be made as a cake if you don't want to do the cupcake thing.

************************************************************


Lemon Cupcakes
From Martha Stewart
Makes about a dozen normal cupcakes, or an 8 inch layer cake

Ingredients

2 sticks (1 cup) unsalted butter, at room temperature
2 1/2 cups all-purpose flour
1/2 teaspoon baking powder
1/2 teaspoon baking soda
1 teaspoon salt
1 tablespoon lemon zest
1 1/2 cups sugar
2 large eggs and 3 large egg yolks
2 tablespoons fresh lemon juice
1 cup buttermilk

For the frosting:

1 lb cream cheese, at room temperature
2 sticks (1 cup) butter, at room temperature
1 teaspoon vanilla extract
4-6 cups sifted confectioner's sugar

Instructions

Preheat oven to 350ºF.
Line baking tins with cupcake papers (or butter and flour two 8" pans).
In a medium bowl, whisk together flour, baking powder, baking soda, salt, and lemon zest. This smells absolutely heavenly. I believe lemon zest is made primarily of angel wings. Or fairy dust. Zesting lemons will make the whole kitchen smell absolutely fantastic.
In the bowl of your mixer fitted with a paddle attachment (or in a regular bowl, if you feel like kicking it old school), beat butter and sugar until light, fluffy, and gorgeous.
Turn the mixer on low and then add eggs and egg yolks one at a time.
Beat in the lemon juice.
Alternately add the flour mixture and buttermilk in batches, starting and ending with the flour. Don't overmix here, just combine until the flour is incorporated.
Portion the batter into baking cups (about 2/3 full)


and bake 20 minutes (or until a toothpick inserted into the center of a cupcake comes out mostly clean.
Let cool 10 minutes in pan, then remove and let cool completely on a rack before frosting.
You will notice that these stand on their own and don't need a muffin tin. Awesome.

**Note: In Martha's original recipe, she made a lemon simple syrup; while the cakes were still warm, she pokes holes in the cake and brushes on the syrup. I omit this step for cupcakes, and they turn out wonderfully moist and scrumptious. I have made this in cake form (for this adorable puppy cake), and I did the syrup. It turned out great. Your call.

Frosting:

Beat cream cheese, butter, and vanilla until smooth and creamy.
Add sugar in 1/2 cup to 1 cup increments, beating well in between additions. After the last addition, beat 3-5 minutes until smooth, light, and fluffy.
Pipe or smooth onto cupcakes (I used a 1M tip).


Lemon curl garnish
These cupcakes are so lovely garnished with a simple lemon peel twist.
These are super simple to make. All you need is a zesting tool. I use this one. Any zesting tool with a channel knife (the part in the middle, not the little holes at the top) will do the trick.
Make sure the fruit is clean, since you will be putting the garnish directly on top of the frosting. You can totally eat these too, although they are too bitter for some people (this also depends on how much pith (the white part under the skin) comes off with the peel).
Hold the fruit firmly, and, applying even pressure with the channel knife, peel the top layer of skin in a spiral around the fruit. Try to get mostly the yellow part and not the pith.

Like so.

Take the length of peel that you cut and twist it around something round (I used a wooden spoon handle). The tightness of your curl will depend on the size of the round thing. For tight spirals, use a skewer. For larger spirals, you could even use your finger.


Let it sit for a couple minutes to hold the shape, then gently slide the curl off the spoon.


Cut into little twists, and bedeck each cupcake with the sunny yellow goodness.


Enjoy lemon cupcakes, and enjoy love.
Congratulations to my amazing grandparents!
Here's to many more years of joy-filled memories!


...
Oh, and a few plastic party cups and a car seat were all that was needed to transport some of the leftovers safely to my cousins who couldn't make it.


Sunday, June 2, 2013

Teal and Grey Wedding Cake


Sort of recently I enjoyed a proud moment in my baking "career." When I first started writing this post, it said "recently I...," but as I sit down and revisit it with hopes of posting sometime in the reasonably near future, I realize that recently may not be entirely accurate anymore. We're talking December here. And it's June. Such is my life. Better busy than bored though (in my opinion).
Anyway, proud moment. Not recently, but doesn't matter. Proud nonetheless. Drum roll please.....

Someone I did not know asked me to make her wedding cake. Like, never met her before.

Granted, we have a mutual friend, but still, I don't know her personally, so I call that a win. I have to admit that I felt some pressure - she wanted me to use a technique that I had never done before, and making a cake for someone I didn't know felt very intimidating. After all, she wasn't likely to pretend that she liked it to keep from hurting my feelings. Thankfully, the cake was a success. I didn't get to speak to the bride post-wedding, but her mother reported that she and her new husband enjoyed the cake, and the guests likewise.

We went through a few ideas when designing this cake (back and forth via email, with pencil drawings and all, as she was living in Hawaii at the time), and landed back on the original idea (with a twist) in the end. The bride originally wanted a funfetti cake covered with colored sprinkles. This evolved into chevron fondant, which evolved into peacock-esque piping, which came back to chevron, which came back to sprinkles, but this time in the wedding colors. Teal and a silvery grey. And keeping the funfetti inside, because, duh. Super fun and festive. With bavarian cream filling and cream cheese frosting. Because, duh. Cream cheese is the best.

Now folks, sprinkles don't come in those colors. They come in a huge range of colors, but not those ones. Rumor has it there are places that will color sprinkles for you, but something of that magnitude far exceeds my budget as a home baker at this point in my life.
Sooo...I decided to dye my own. Not exactly ground-breaking science, and there are a couple tutorials out there on how you can do this, but I still had to play around with it a bit to get satisfactory results. And I am pretty sure I will never stop finding sprinkles on my kitchen floor. Ever. I swear they can move on their own. For inanimate objects, they have a remarkable ability to jump, bounce, and generally spread themselves around your home.

There was also an interesting moment of...I don't want to say panic, but it was more like chagrin, when I made a test cake a couple weeks before the wedding. It looked very pretty, it wasn't that difficult, and it tasted great. However, every person that tasted the cake had pretty blue smiles. They did match the wedding colors, but I don't think blue teeth are on a must-have photo list for most couples' wedding photography. Also, touching the sprinkles produced a lovely blue-fingered effect that would have no doubt looked...interesting when transferred to a white wedding dress. I emailed the bride these concerns (while trying to sound as upbeat as possible), and she was incredibly positive and gracious. On with the sprinkle plan! We love the blue! That's why they invented toothpaste!

Putting on the sprinkles was pretty entertaining too. Lots of gently smooshing, applying and reapplying and reapplying and reapplying until I had covered as much frosting as possible. And then reapplying to bare spots once we got to the venue.
The cake was assembled on site, since I don't like to travel with tiered cakes assembled if possible. This means that the border in between layers was piped on site too. My sister took some nice close ups of this process. Unfortunately she wasn't available for the rest of the cake, otherwise we would have pictures of the rest of the process too. My bad.
Anyway...enjoy these images of colorful cream cheese frosting. Mmmmm. Cream cheese.


I have since seen some of the wedding pictures, and as far as I can tell, they either didn't eat the cake, or their teeth did not stay blue for long. Or they took my advice and carried toothbrushes in their pockets to the wedding.

Here it is pre-topper. One of the bridesmaids made a topper in the wedding colors, and I think for not having seen it first, we ended up with a pretty good color match!


This cake was such fun to look at, and I am pleased with the results. Long live millions of non-pareils!