Showing posts with label cupcakes. Show all posts

Thursday, August 15, 2013

Lemon Cupcakes and a 60th Wedding Anniversary


60 years is 21,900 days, which is 525,600 hours, which is 31,536,000 minutes, which is 1,892,160,000 seconds. Roughly. And that is how many seconds my grandparents have been married. They have been in love for even longer than that.

On August 15th, 1953, two people committed their lives to one another, and now, 60 years, 6 children, 29 grandchildren, and 1 great-grandchild later, they are still madly in love, and a great inspiration to us all.


A small portion of this family (the ones that could get time off work and who don't live scattered across the planet) gathered a couple weeks ago to surprise my wonderful grandparents in a celebration of their love. Their children took them to dinner, and while they were there, a small group of my cousins and I set out desserts and a couple decorations for when they returned. It was the last in a string of surprises that week, including spontaneous visitors and world travelers. Good times were had by all.


Enjoying cake at their wedding...

...and cupcakes at their 60th.

I made these lemon cupcakes as a sweet summer treat, in a cheerful, festive hue, bedecked with (all together with me now) cream cheese frosting. And plus, have you seen these Paper Eskimo cups yet? Holy cuteness! Like 12 on a scale of 1-10, if cupcake papers had a cuteness scale.


See? Holy moly.

These lemon cupcakes are easy to make, delicious and tangy and moist, and can be made as a cake if you don't want to do the cupcake thing.

************************************************************


Lemon Cupcakes
From Martha Stewart
Makes about a dozen normal cupcakes, or an 8 inch layer cake

Ingredients

2 sticks (1 cup) unsalted butter, at room temperature
2 1/2 cups all-purpose flour
1/2 teaspoon baking powder
1/2 teaspoon baking soda
1 teaspoon salt
1 tablespoon lemon zest
1 1/2 cups sugar
2 large eggs and 3 large egg yolks
2 tablespoons fresh lemon juice
1 cup buttermilk

For the frosting:

1 lb cream cheese, at room temperature
2 sticks (1 cup) butter, at room temperature
1 teaspoon vanilla extract
4-6 cups sifted confectioner's sugar

Instructions

Preheat oven to 350ºF.
Line baking tins with cupcake papers (or butter and flour two 8" pans).
In a medium bowl, whisk together flour, baking powder, baking soda, salt, and lemon zest. This smells absolutely heavenly. I believe lemon zest is made primarily of angel wings. Or fairy dust. Zesting lemons will make the whole kitchen smell absolutely fantastic.
In the bowl of your mixer fitted with a paddle attachment (or in a regular bowl, if you feel like kicking it old school), beat butter and sugar until light, fluffy, and gorgeous.
Turn the mixer on low and then add eggs and egg yolks one at a time.
Beat in the lemon juice.
Alternately add the flour mixture and buttermilk in batches, starting and ending with the flour. Don't overmix here, just combine until the flour is incorporated.
Portion the batter into baking cups (about 2/3 full)


and bake 20 minutes (or until a toothpick inserted into the center of a cupcake comes out mostly clean.
Let cool 10 minutes in pan, then remove and let cool completely on a rack before frosting.
You will notice that these stand on their own and don't need a muffin tin. Awesome.

**Note: In Martha's original recipe, she made a lemon simple syrup; while the cakes were still warm, she pokes holes in the cake and brushes on the syrup. I omit this step for cupcakes, and they turn out wonderfully moist and scrumptious. I have made this in cake form (for this adorable puppy cake), and I did the syrup. It turned out great. Your call.

Frosting:

Beat cream cheese, butter, and vanilla until smooth and creamy.
Add sugar in 1/2 cup to 1 cup increments, beating well in between additions. After the last addition, beat 3-5 minutes until smooth, light, and fluffy.
Pipe or smooth onto cupcakes (I used a 1M tip).


Lemon curl garnish
These cupcakes are so lovely garnished with a simple lemon peel twist.
These are super simple to make. All you need is a zesting tool. I use this one. Any zesting tool with a channel knife (the part in the middle, not the little holes at the top) will do the trick.
Make sure the fruit is clean, since you will be putting the garnish directly on top of the frosting. You can totally eat these too, although they are too bitter for some people (this also depends on how much pith (the white part under the skin) comes off with the peel).
Hold the fruit firmly, and, applying even pressure with the channel knife, peel the top layer of skin in a spiral around the fruit. Try to get mostly the yellow part and not the pith.

Like so.

Take the length of peel that you cut and twist it around something round (I used a wooden spoon handle). The tightness of your curl will depend on the size of the round thing. For tight spirals, use a skewer. For larger spirals, you could even use your finger.


Let it sit for a couple minutes to hold the shape, then gently slide the curl off the spoon.


Cut into little twists, and bedeck each cupcake with the sunny yellow goodness.


Enjoy lemon cupcakes, and enjoy love.
Congratulations to my amazing grandparents!
Here's to many more years of joy-filled memories!


...
Oh, and a few plastic party cups and a car seat were all that was needed to transport some of the leftovers safely to my cousins who couldn't make it.


Sunday, April 28, 2013

Playing Catch Up - Project Snapshots


Often when I am working on a project, I will take plenty of pictures, compose a post, and diligently sit down to write it up within a reasonable amount of time.
Then there are all those other little things that I make in between. All the cakes, cupcakes, treats, snacks, or what-have-you that I don't take a bunch of pictures of, don't really have the time to write about on a Tuesday afternoon, or some that were even made pre-blog.

I don't think those projects deserve to get ignored or left all alone in the iPhoto archives, never to be drooled over, so here are some of my recent (or maybe not super recent) favorites. A series of mini-posts, if you will.

Colorful Bridal Shower "Margarita" Cake


This cake was for my best friend's bridal shower in 2010. They honeymooned in Mexico, so in anticipation of that, the shower was kinda Mexico themed. In a colorful, sangria, margarita, summery kind of way. The cake was white chocolate cake with raspberry filling for one tier, and coconut cake with lime curd filling for the other. I covered the layers with colorful fondant, cut little fondant limes slices, and garnished the whole thing with some glitter. Because glitter. You all know by now that if glitter is an option, then yes, glitter it will be.

50th Birthday Cupcakes


These were birthday cupcakes for my Mom's friend. Dark chocolate cupcakes with strawberry frosting. Sooooo-oooo-oooo good. The "50" toppers are hand-piped chocolate.

Golf Cupcakes


A going-away gift for a golf lover. These were very fun to make. Chocolate cupcakes (everyone likes chocolate cake), vanilla buttercream tinted green and piped with a grass tip, gumpaste golf balls, and little flags made from toothpicks and scrapbooking paper.

Football Cake Balls


This year my friends threw a Superbowl party. Naturally, I made something. Cake balls. Because cake balls are appropriate for literally every kind of event you could think of. I challenge you to think of something that you wouldn't bring cake balls to or eat cake balls at. (How many times can you say cake balls in a row without it being weird?)
These ones were chocolate shaped like footballs, covered with dark chocolate, and piped with little white laces.

Birthday Cake Balls


More cake balls! These ones were special for me, because they marked the first time that I shipped treats across the country...and they survived! A woman commissioned them for her brother's birthday. The recipient said they were still delicious and intact by the time they arrived in Wisconsin.
His sister said that his favorite color is blue, so I did some blue stripes, some with chocolate jimmies, and some with chopped pecans. A dozen of the cake balls were chocolate, and a dozen were red velvet. All were covered in a dark chocolate coating.

Puppy Birthday Cake


This cake was tons of fun. It was a commission from one of my students. Her mom asked if I could/would make her cake, and when I said that I would be delighted to, her daughter drew me a design. The design included yellow, red, turquoise, purple, a puppy, and writing. Kids should design all cakes; they have the best sense of fun. Anyhow, this is how it turned out.
The sheet cake part is lemon with lemon curd filling and vanilla buttercream, and the puppy face on top is chocolate cake with chocolate buttercream.
She loved it. And so did I. From now on, if it is possible for a kid to design a birthday cake, go with it.


Sunday, March 17, 2013

Top O' The Mornin'! - Irish Car Bomb Mini-Cupcakes


Pop quiz: Put the following three things together, and what do you get?


If your answer was "An Irish Car Bomb!" you are partially correct.

Another acceptable response would be cupcakes. Cuz, you know, pretty much anything is good in cupcake form. Anything edible anyway. You know what I meant.

One of my friends threw a St. Patrick's Day party this weekend (yay!), and she said we could bring treats (yay again!). The party was great. She made people wear green or they couldn't come in (I think we might be kindred spirits). I love themed parties, and I really love themed treats. So I made some. Themed treats, that is.
These ones:


I'd like to claim that I'm growing up, but I do still occasionally enjoy an Irish Car Bomb from time to time, so I made these cupcakes as a tribute to the drink that most people drink once a year to celebrate our dear friend St. Patrick.

They start with a wee Guinness chocolate cupcake, topped with Irish whiskey ganache and Bailey's buttercream. And for flair, even wee-er green shamrocks with glitter. Because why not? Glitter's super festive.

These were easy, but time consuming to make, but you could easily cut down on the time by not doing the shamrocks or not making 80 of them.

Lá Fhéile Pádraig Sona Daoibh!

( I apologize in advance if I offend anyone who actually speaks Gaelic, since I am not entirely sure that actually says Happy St. Patricks' Day)

*****************************************************************************

Irish Car Bomb Cupcakes

Guinness Chocolate Cupcakes 

(Makes about 80...ish mini cupcakes)

Ingredients

CAKE

2 cups flour
2 cups sugar
1/4 teaspoon salt
2 sticks (1 cup) butter
4 heaping tablespoons cocoa powder
1 cup Guinness 
1/2 cup buttermilk (you can make your own with a little milk and lemon juice)
2 whole beaten eggs
1 teaspoon baking soda
1 teaspoon vanilla

GANACHE

8 ounces bittersweet chocolate
2/3 cup heavy whipping cream
2 tablespoons butter
1-2 teaspoons Irish whiskey (to taste)

BAILEY'S BUTTERCREAM

2 sticks (1 cup) butter
4 cups confectioner's sugar
2 teaspoons vanilla
3-4 tablespoons Bailey's Irish Cream

SHAMROCK TOPPERS

green candy melts
white candy melts (optional)
green disco dust


Directions

For the cupcakes:

Preheat oven t350°. Line mini muffin tin with cupcake liners. I used gold foil ones like these, cuz, you know, pot o' gold and all that. It was adorable.

Combine flour, sugar, and salt in a mixing bowl. 

Melt butter over medium-low heat in a saucepan. When melted, add cocoa powder (make them really heaping, because it's chocolate, and chocolate is so good. Whisk together the butter and cocoa powder until smooth. 
Add Guinness. Let this heat through. It'll get pretty bubbly, but does not need to come to a rolling boil.
Take chocolate/butter/beer mixture off the heat and pour it into the flour/sugar mixture in the mixing bowl. Briefly mix gently to let the mixture cool.

In a small bowl or measuring cup, mix together the buttermilk, beaten eggs, baking soda, and vanilla.
Add this to the chocolate mixture and combine. Don't overmix. And don't add it when the chocolate is still hot, or you risk making chocolate scrambled eggs.

Spoon mixture into mini-cupcake liners and bake for 12 minutes (or until tops spring back when touched, cake tester comes out clean, etc. etc.).


For the ganache:

Chop chocolate into small pieces and put in a medium bowl.

Heat cream gently in a double boiler (you don't need an actual double boiler. A metal bowl over simmering water does the exact same thing). 

Pour cream over chocolate and mix until smooth. Add butter. Mix until smooth again. 

Add whiskey. I recommend if you're not a huge whiskey drinker that you add it little by little until you like the taste.

Dip the little cupcakes in the ganache and then let it set. It will set up nicely without putting them in the fridge, but you do need to let them set before you frost them so the frosting doesn't just slide off the top.

(I dipped these instead of filling them because they're so teeny. If you made regular sized cupcakes, you could easily inject this ganache into the cakes, and that would be delish as well.)


For the frosting:

In a mixer, beat the butter until smooth and fluffy. Add the confectioner's sugar in 1/2 or 1 cup portions, beating well in between (this makes it nice and fluffy and keeps it from being grainy or gritty).
Add vanilla and Bailey's and beat until smooth and creamy.

Frost in your preferred manner. I used a Wilton #21 tip and swirled it on. 


For the toppers:

Melt green candy melts in a small bowl or glass measuring cup. I added a few white ones to lighten the green up just a titch. 
To melt, microwave the melts 30 seconds at a time, stirring in between, until smooth. The reason you're melting them in short bursts is so that they don't get overheated. You really only need them to be just melted. They will look solid until you stir them.
Anyhow, once they are melted, pour them into a piping bag fitted with a Wilton #1 tip.
Pipe out the shamrocks. They are just four little teardrop shapes that touch in the middle, and then a stem on the bottom.


Add a sprinkle (my preference is a generous sprinkle, because...glitter) of disco dust while they are still wet. 


Allow to dry, and then add to the top of each cupcake. Just nestle 'em right in there.


And there you have it. Eat, drink, and be Irish!


Look at that. Look at that chocolate, shiny, shiny ganache, and creamy Bailey's goodness. And the glitter. Ach! 'Tis delicious they look, to be sure.

Éirinn go Brách! Enjoy!

Saturday, May 26, 2012

"Cinco de Graduation-Derby" Cake


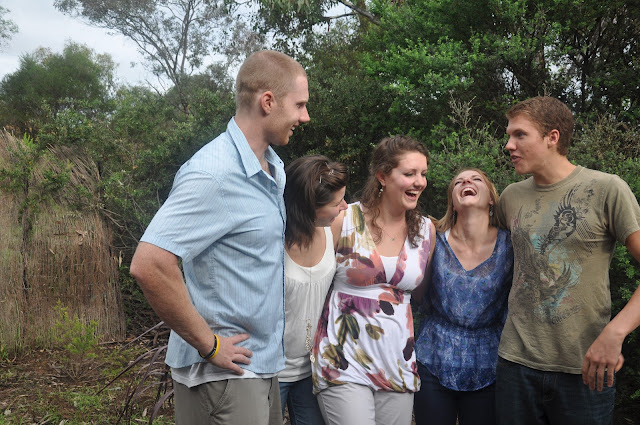
My sister Hillory is a rock star. This is her (well, if you want to get technical, this is me and her).


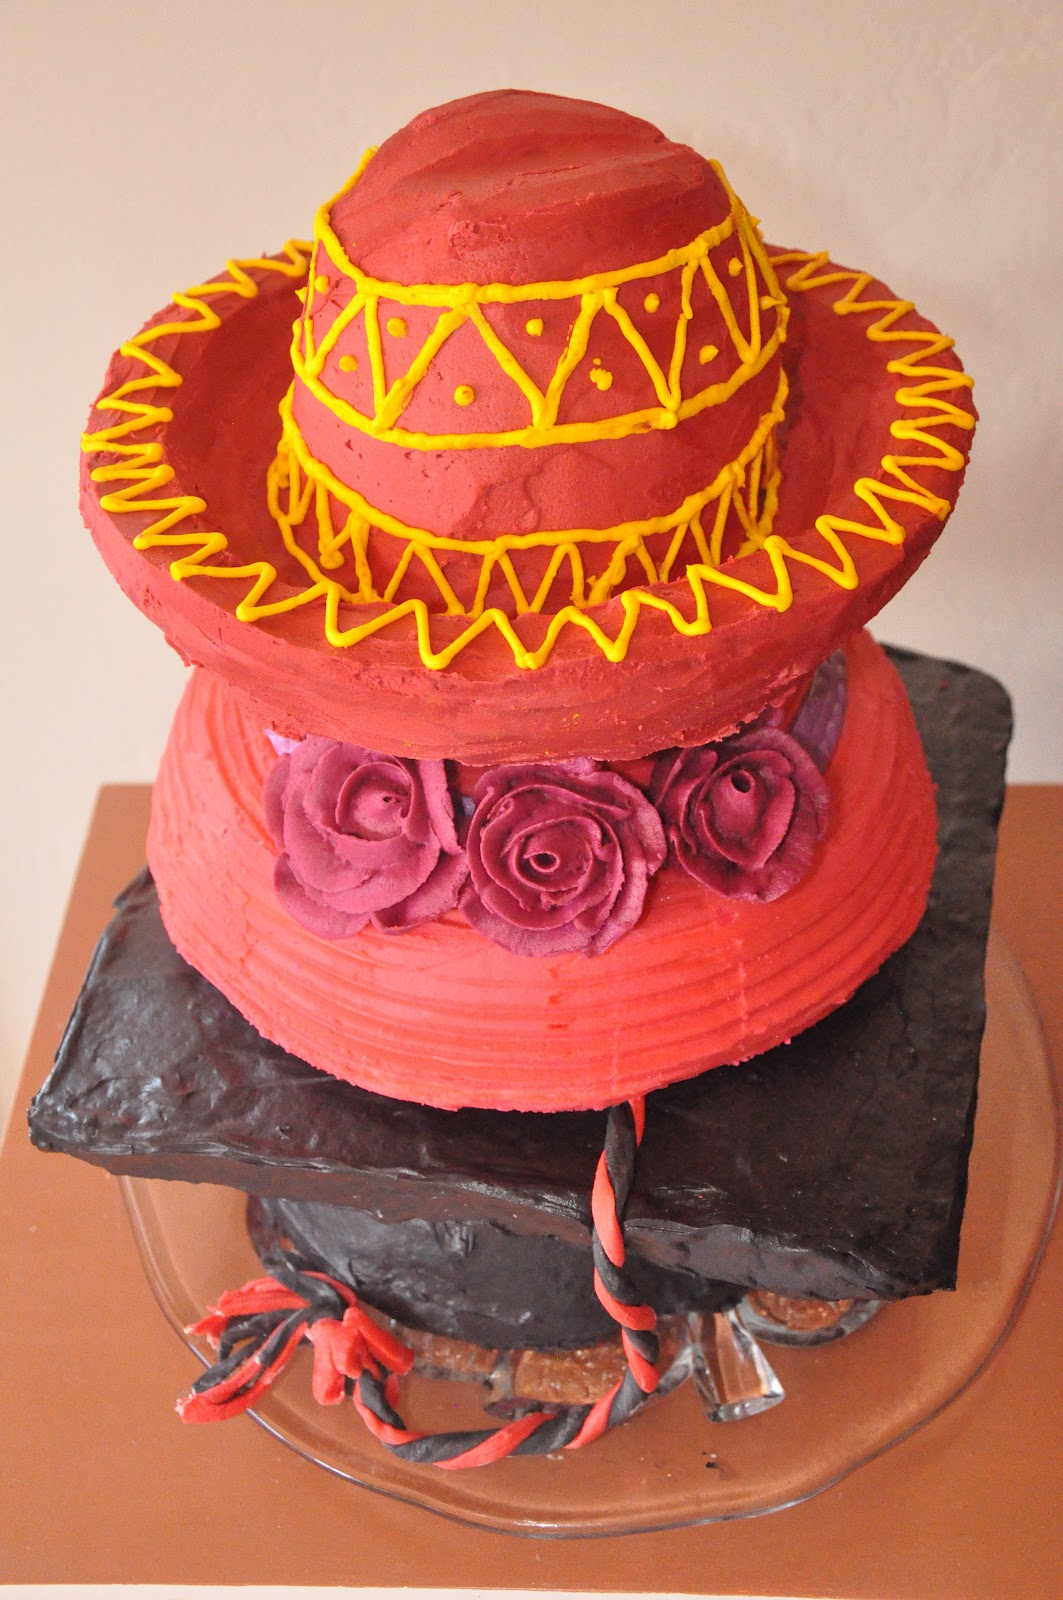
Before I started rambling about frosting and piping and trying to drive cakes three hours over a high-altitude mountain pass, I wanted to put that out there. She is my best friend in the whole world, bar none. She is smart, beautiful, funny, and talented. This cake was made to honor her and her friends' graduation from college. However, the twist this time is that, in addition to being Hillory's graduation, it was also Derby Day and Cinco de Mayo. Two days that I think should not be neglected in the celebration department (or at least taken advantage of as an excuse to eat cake). Hillory had the awesome idea to incorporate these days into the cake by doing three different hats: a graduation cap, a derby hat, and a sombrero.
Challenge. Accepted.

As I think I have mentioned before, I am a firm believer in taste first, design second. I think cakes should be beautiful and whimsical, but the whole point of a cake is to eat it, so the flavors need to be there, and it needs to be scrumptious. This cake presented me with a great opportunity to have some fun with flavor. The bottom was red velvet, so that when the cake was cut, it would represent the school colors (red cake, black frosting). The middle tier was white chocolate cake with raspberry filling (by request). The top tier was coconut cake with lime curd filling (in honor of Cinco de Mayo).

To give the hats shape, I made the brims of the grad cap and the sombrero out of rice krispie treats (the derby hat is all cake).

I used this Red Velvet Cake recipe, and this Cream Cheese Frosting recipe for the graduation cap cake.
I made two layers, filled them with cream cheese frosting between the layers, and then carved the cake into a rounded cap shape. I colored the rest of the cream cheese frosting black. Now, I have to tell you, this is not the most fun activity in the world. It takes a lot of color, and nobody wants their frosting to taste like food dye. So, I dyed the frosting dark green first, and then used a whole lotta black. It will darken after a while, so let it sit for a couple of hours in the fridge. Oh, and black food dye stains stuff, so wear an apron and try not to get it all over everything in the kitchen (like I do). You might want to wear gloves if you don't want your fingernails to be purple on the edges for about a week. Me, I think it added a little something to my graduation outfit. And every other outfit I wore for the next eight days.
For the mortarboard, I made rice krispie treats and pressed them into a square about an inch thick. Even though I let it sit for a couple hours, its size and thinness meant that I needed to support it with some cardboard. I frosted this and attached it to the putting-on-your-head part (is there a name for that? Isn't it called the crown or something?) with wooden skewers. The tassel was made out of fondant (homemade marshmallow fondant, to be specific - I will include the recipe in another post).

The Kentucky Derby Hat was White Chocolate Cake with a raspberry filling, from the recipe included below. I stacked the tiers (with buttercream and raspberry filling in between), and then carved the cake into a hat-ish shape (albeit a hat that I thought might be sturdy enough to hold up another one...). I crumb-coated it with pink frosting (so that another color, like white, wouldn't show through in the final coat) and then stuck it in the fridge to set for a little while. While it was chilling, I tinted some more buttercream purple and piped out some roses (there are tons of great tutorials out there on youtube and such for those of you who are new to this...) to decorate the hat. It's less tricky than I used to think, and if I can do it, you can too. Here they are on the cake...


After the final coat of frosting, I used one of these side-design-thingamajigs to put a little stripy effect on the hat (I'm planning on coming out with a cake term dictionary any day now). I rolled out a hat band with some fondant dyed purple, and wrapped that around the hat. The flowers were to be transported to Gunnison separately so they wouldn't slip off the cake in the car.


As for the sombrero...this one was fun. Probably one of my favorite cakes to make so far. As I mentioned before, the brim was made out of rice krispie treats.
Oh wait a second. Here is where I apologize for not taking pictures of the process. Again. I'm working on it, I swear. With that out of the way... we were talking about rice krispie treats. Right. So anyway, I pressed these ones into a pie dish so that they would have a brim-like shape. It worked! Gotta love that. It was supported underneath with a piece of cardboard, just in case. The crown (see, with the using of the correct term? Bet you liked that) is made of cake. Coconut cake with lime curd filling (recipe below). So Good. The lime curd is sour, and the coconut cake is dense and moist. I carved it into what I thought resembled a sombrero crown (please don't google images of a sombrero right now, because as it turns out, I should have done that first, although I guess it's close enough). You guessed the next steps, so say them with me now...crumb coat, refrigerate, final coat of frosting, decorate. Yay! The decorating of this one was fun, because I totally did not consult my plans, but rather filled up a piping bag with yellow frosting, and, using a small round tip, kinda just went for it.
Here is the final result. Fun, no?


I was pleased with how the whole thing turned out (and especially the fact that it didn't fall over/melt/lack taste, etc.). And I also want to say that the transport of these cakes was an experience unto itself. My sister went to college in a town about 2 1/2 to 3 hours away from where I live, depending on who's driving and how often she gets stopped to get speeding tickets. This drive also includes a couple dozen high-altitude mountain passes (or three, but whatever). I drive a Jeep with questionable shocks (or at least if feels that way...let's just say it's not a Rolls). Oh, and did I mention that I had to do this at 2:00 in the morning? Don't ask. Normally I would be sleepy driving at 2am, but the adrenaline surging through my veins every time I drove over each piece of gravel on the road did the trick. All three tiers survived the journey, and all three tiers survived a night and a morning in a college house with no supervision (I didn't even see any finger marks in the frosting).


Congratulations to my beautiful sister!


Recipes

White Chocolate Cake with Raspberry Filling

(adapted from this recipe)

Ingredients

2 1/2 cups all purpose flour
1 teaspoon baking soda
1/2 teaspoon baking powder
1/2 teaspoon salt
6 ounces white chocolate, chopped
1/2 cup hot water
1 cup butter, softened
1 1/2 cups white sugar
3 eggs, room temperature
1 cup buttermilk, at room temperature

Directions

Preheat oven to 350°
Sift together the flour, baking soda, baking powder, and salt.
In a small saucepan, melt together the chocolate and the water on low heat (this is not a double boiler situation, the chocolate and the water get mixed together). Melt and stir until smooth, and then cool to room temperature.
In another bowl (like the bowl of your mixer), cream together the butter and the sugar until light and fluffy. Then add the eggs, one at a time, beating in between each addition.
Stir in the flour mixture and the buttermilk in alternating batches, starting and ending with the flour mixture.
Gently mix in the white chocolate/water mixture.
Pour batter into 2 round 9-inch pans, prepared with baking spray.
Bake for 3-35 minutes, or until a toothpick comes out clean when inserted in the center of the cake.

Buttercream frosting

Ingredients

2 sticks (1/2 lb) unsalted butter
4-6 cups confectioner's sugar (more sugar means a stiffer frosting)
1/4 teaspoon salt
2-3 tablespoons heavy cream
2 teaspoons vanilla extract

Directions

In the large bowl of a mixer, with a paddle attachment, beat the butter for about 3 minutes.
Gradually add the sugar, 1 cup at a time, beating well after each addition. If you don't beat it in between, the frosting might end up grainy.
Add salt during one of the sugar additions.
Add two tablespoons of cream and vanilla, and beat well. Add cream to reach desired consistency (stiffer is better for piping).

**Note: I quadrupled this for this particular cake.

Raspberry Filling

There are a couple ways to do this. You can use raspberry jam on its own or with buttercream, or you can blend raspberries (fresh or frozen) into some buttercream to make a fruity filling. Actually, it would be more accurate to say that you could do this any way you want. I blended some raspberries into frosting, and also spread some jam on the cake before adding the filling.

Coconut Cake

(adapted from this recipe by the Barefoot Contessa)

Ingredients

3 sticks (3/4 lb) unsalted butter, at room temperature
2 cups sugar
5 eggs, at room temperature
1 1/2 teaspoons vanilla extract
1 1/2 teaspoons almond extract
3 cups all purpose flour
1 teaspoon baking powder
1/2 teaspoon baking soda
1/2 teaspoon salt
1 cup milk
4 ounces sweetened shredded coconut

Directions

Preheat the oven to 350°F
Prepare 2 round 9-inch pans with baking spray (or butter and flour and parchment paper).
Sift together flour, baking powder, baking soda, and salt in a large bowl.
In the bowl of your mixer with the paddle attachment, cream the butter and sugar on a medium speed until light and fluffy (about 3-5 minutes).
Add the eggs one at a time, beating and scraping the bowl in between each addition.
Add the vanilla and almond extracts and mix well.
Don't be worried if the mixture looks curdled here. It always does, there's nothing wrong with it.
With the mixer on low speed, add the flour mixture and the milk in 3 alternating batches, starting and ending with the flour. Don't overmix here, you want to mix it just enough to combine all the ingredients.
Gently fold in the coconut with a spatula.
Pour the batter into the prepared pans. Bake for 45-55 minutes, or until top is lightly golden and a toothpick comes out clean.

Lime Curd

(from here)

Ingredients

1 cup granulated sugar
3 large eggs
1 cup fresh lime juice
the zest of 3 large limes
1 stick (1/4 cup) butter, melted

Directions

**Note: This makes a lot of lime curd. But the extra is so yummy...on ice cream, extra cake, or...a spoon.

Put sugar, butter, and eggs in a medium to large sized microwave safe bowl.
Whisk well until smooth.
Stir in lime juice and zest.
Microwave on high for 2 minutes.
Stir and cook on high for 1 minute.
Repeat the last step (stir and cook on high for 1 min) until the mixture reaches 196°F, or is thick enough to coat the back of a spoon.
When finished, cover the mixture with plastic wrap placed directly on the surface of the lime curd.
Refrigerate at least a couple hours to set.
You can mix this with buttercream or spread it directly on the cake. Or eat it off a spoon. Your call.


Here we are again. At her graduation. Goodness gracious, she's pretty.


Sunday, March 25, 2012

A Tale of Two Cupcakes

First things first. The trip to Australia was great. My favorite part by far was simply hanging out with my brothers and seeing family and friends, although sitting on the beach and gallivanting around Sydney weren't too shabby either.
Plus I got to meet Geoffrey Zakarian in the lounge at the Sydney Airport on the way home! Very exciting for this Chopped and Iron Chef fan.

Happy siblings
Even happier siblings...not sure what was said here, but obviously it was hilarious.
I love love love the birds there.
We went to the Harry Potter Exhibition...so great!
One of my favorite views of Sydney...from the back of the Manly Ferry.


My brother and his girlfriend threw a great little barbecue get-together the first weekend we were in Canberra; this was the perfect excuse to bake in their new kitchen. I wanted to do something totally kitschy along the America/Australia lines, because that's how I roll. I decided pretty quickly that I wanted to do cupcakes (easy to serve, easy to eat, good for a crowd). I also decided pretty quickly that the "Australian" cupcakes would be Lamington-inspired. Lamingtons are a traditional popular Australian treat, and the flavors would be easy to translate into cupcake form. As for the "American" cupcakes, at first I was thinking...lemonade, pink lemonade (not sure why)...and then it came to me. Apple pie. Duh! I mean seriously, you probably could actually have seen the light bulb over my head. Soooo obvious. And then I was like...caramel apple pie. Even better.

The next hurdle was the fact that I would be baking in a kitchen that is not mine (albeit a literally brand new one. Seriously. They finished the renovation the morning we arrived). Now let me tell you that I am a creature of habit. But no worries y'all (a little Australian/American humor for you there. I know, it was lame, but I'm sticking to it). I borrowed a mixer from a friend, and completely tore apart poor Ben and Natalie's kitchen scrounging for ingredients and tools.

I did hit a couple snags, which I will blame on the weather mostly. More on that in a jiffy. Let's get to it, because food is the reason you're here, probably.

First, the Caramel Apple Pie Cupcakes. These were positively scrumptious. They didn't turn out half as pretty as I would have liked, but I will be making these over and over again. Whatever they looked like, they were definitely a hit, taste-wise. And that, folks, is the reason for cupcakes in the first place. I will try them again soon, and see if I can bring the looks up to the standard of the mouth-watering deliciousness.
Oh, and this is where I blame the weather. The Swiss Meringue Buttercream was very thin. I attempted a couple fixes, but with little success. In the end, I had to pipe as-is, since guests were beginning to arrive. The good news is that it still tasted good.
The second issue was the caramel that I put on top. Issue one: I didn't have any handy-dandy squeeze bottles that I use for tasks like this at home, so I spooned it over. This resulted in a little too much caramel on each cupcake (although I'm not altogether sure there is such a thing). Issue two: The caramel had thickened too much to pour, so I zapped it for a few seconds in the microwave. Rookie mistake. Now it was too hot, and it melted the already thin buttercream. That one I can't blame on weather or equipment. That one was all me. Rushing and not thinking it through. Oops. But again, taste did not suffer, so no harm done in the long run.

Now the lamington cupcakes. These were simple, no-frills goodness. Simple white cake that I added a little fresh lemon to for freshness and lamington-ness, with a chocolate buttercream frosting, and topped with desiccated coconut. There really weren't any issues here, although I would have preferred to use one of my jumbo piping tips instead of a little plastic one (the only one I could find at the grocery store the day before the BBQ).

As I said, both were a hit at the party, and I would make both again, especially those to-die-for Caramel Apple Pie Cupcakes.


Caramel Apple Pie Cupcakes 
(adapted from The Craving Chronicles)

Cinnamon Cupcakes 
Makes 2 dozen cupcakes
*Note: I would use these again and again, even without the apples and caramel. So good.

Ingredients
1 cup milk
1/2 cup (1 stick) unsalted butter, at room temperature
2 cups all purpose flour
1 1/2 teaspoons baking powder
2 teaspoons ground cinnamon
1/4 teaspoon salt
4 large eggs, at room temperature
1 3/4 cups sugar
1 teaspoon vanilla extract

Directions
Preheat oven to 350°F. Line two 12-cup muffin tins with cupcake liners.
Heat milk and butter in a small saucepan over medium heat until butter is melted. Don't boil! Remove from heat.
Whisk together flour, baking powder, cinnamon, and salt in a separate bowl.
Using a stand mixer with a whisk attachment, beat eggs and sugar until thick ribbons form. This should take a few minutes, up to 5 or so.
Add flour mixture to egg/sugar mixture and beat on low until just incorporated. Add milk mixture and vanilla, and beat gently until combined.
Divide evenly among the baking cups. Bake at 350° for 16-18 minutes, or until a toothpick inserted in the center comes out clean.
Cool in pans for 5 minutes, and then transfer to a wire rack to cool completely.

********************

Apple Filling
Makes about 2 cups. This is a little more than you need (or a little more than I needed anyway). You could save the rest and use it on ice cream or in yogurt. In my case, my brothers, my sister, and Natalie were more than willing to scavenge over any scraps from my baking, these extra apples included.

Ingredients
2 tablespoons unsalted butter
about 1 1/2 pounds Honeycrisp apples (about 4 medium apples), peeled, cored, and finely diced
(I couldn't find Honeycrisp in Australia, so I used half Granny Smith, and half Jonathan)
1 tablespoon granulated sugar
2 tablespoons brown sugar
1 teaspoon fresh lemon juice
1/8 teaspoon cinnamon (I added a little extra)
1/2 tablespoon cornstarch
1 tablespoon water

Directions
Melt butter in a medium saucepan over medium heat.
Add the diced apples, sugars, lemon juice, and cinnamon.
Cook until apples are tender and release their juices. This takes about ten minutes. And it smells absolutely delicious.
In a small bowl, combine cornstarch and water to make a slurry. Add the cornstarch slurry to the apples and stir, cooking until mixture thickens.
Remove from heat and cool to room temperature.
If you make this a day ahead, it can be stored, covered, in the refrigerator.


********************

Caramel Swiss Buttercream Frosting
(This was relatively unsuccessful for me. The humidity is probably to blame. It was quite muggy that day, and raining off and on. And the fact that I was seriously rushing. I would still try it again, as the taste was there.)
Makes plenty for 24 cupcakes.

Ingredients
6 large egg whites
1 1/2 cups granulated sugar
pinch of coarse salt
3 sticks unsalted butter, cut into cubes
1/2 cup caramel sauce, cooled (it must be cooled, at least to room temperature, or it will melt the frosting)
1 teaspoon vanilla extract

Directions
Place a saucepan with about 2 inches of water over medium-low heat and bring to a simmer.
In the metal bowl of a stand mixer, combine egg whites, sugar, and salt. Place the bowl over the simmering water, and whisk constantly until the mixture reaches 160°F on an instant-read thermometer (the sugar will be dissolved, and the mixture will resemble marshmallow fluff).
Remove bowl from heat and attach to stand mixer.
Beat with whisk attachment until stiff meringue peaks form and the outside of the bowl no longer feels warm (about ten minutes).
Switch to paddle attachment.
On low speed, add one cube of butter at a time, waiting until incorporated before adding the next one.
Once all the butter is added, slowly pour in the caramel with the mixer on low speed.
Add vanilla and continue beating until smooth.

*If your frosting curdles, keep beating! If it is soupy, put it in the fridge for 10-15 minutes and then beat until smooth.

********************

Caramel Sauce
Makes...a lot.

OK, so here's the deal with the caramel. You can make your own. It's not super tricky, and there is a recipe here, as well as about a gazillion and a half other websites with easy to follow recipes and tutorials.
But remember when I said how I was in a rush and stuff? Yeah, so I did the cheater's caramel sauce, which is still very yummy.

Here it is:
Melt about 30 caramel chews and 5-6 tablespoons heavy whipping cream in a double boiler. Cool to room temperature. Yes, it's that easy. You might have to play with the caramel to cream ratio depending on the size of the caramels you buy.

********************

Assembly
Working with completely cooled cupcakes, scoop out a small hole for the filling. You can use a small paring knife, the end of a metal piping tip, or anything else that will allow you to cut a cone-shaped wedge from the middle of each cake. Be careful not to make it too large, or your cupcakes will fall apart. You want to make it big enough to add a small scoop of apple filling, about half a tablespoon or so.


Some people save the "lids" and put them back on top of the filling, but I fed mine to the ravenous (or so they claimed) spectators, and just frosted directly on top of the apples. It's your call.
Depending on whether or not you are replacing the lids, fill the holes not quite to the top (if you're using lids), or all the way to the top (if you're not replacing the lids).


Pipe the frosting on top of the cupcakes and drizzle with caramel sauce (make sure your caramel is at room temperature, or else your cupcakes will end up all melty looking like mine).
I also added a little extra apple filling to the top.


Lamington Cupcakes
Adapted from here.
Makes 24 cupcakes

Ingredients

Vanilla Cupcakes:
1 1/2 cups self-rising flour
1 1/4 cups all purpose flour
1 cup (2 sticks) unsalted butter, softened
2 cups sugar
4 large eggs, at room temperature
1 cup milk
1 teaspoon vanilla extract
about a teaspoon fresh lemon juice

Chocolate Buttercream Frosting:
1 cup (2 sticks) unsalted butter, softened
4 cups confectioner's sugar
1/4 teaspoon salt
2-3 tablespoons heavy cream
2 teaspoons vanilla extract
6-8 ounces unsweetened or bittersweet chocolate, melted
Desiccated (shredded dried) coconut to top (As far as I know, you can't find desiccated coconut in the States. At least I've never seen it. I'm sure shredded dried coconut would work fine, it will just be bigger pieces. You could even try giving it a pulse or two in a food processor or blender to make the pieces finer.)

Directions

Cupcakes:
Preheat oven to 350°F. Line muffin tins with paper liners.
In a small bowl, combine the flours with a whisk and set aside.
In the bowl of a mixer on medium speed, cream the butter until smooth. Add sugar gradually and beat until fluffy, about 3 minutes.
Add the eggs one at a time, beating well after each addition.
Add the dry ingredients in three parts, alternating with milk and vanilla, and beginning and ending with dry ingredients. Do not over-mix here. After each addition, beat gently until just incorporated, scraping bowl in between.
Spoon the batter into liners filling 2/3 to 3/4 full.
Bake for 20-25 minutes, or until a toothpick inserted in the center comes out clean.
Cool in tins for 5-10 minutes, and then transfer to a wire rack to cool completely before icing.

Frosting:
In the large bowl of a mixer, beat butter for about 3 minutes.
Gradually add sugar a cup at a time, beating well after each addition. Take your time here and the frosting will be smooth. If you rush, it will be grainy.
Add the salt during one of the sugar additions.
Add two tablespoons heavy cream and beat for 3-4 minutes. If the frosting is too thick, add more cream.
Add vanilla and melted chocolate and beat until combined.
Spread or pipe onto cupcakes.
Top with coconut.


Enjoy!