Showing posts with label piping. Show all posts

Tuesday, December 24, 2013

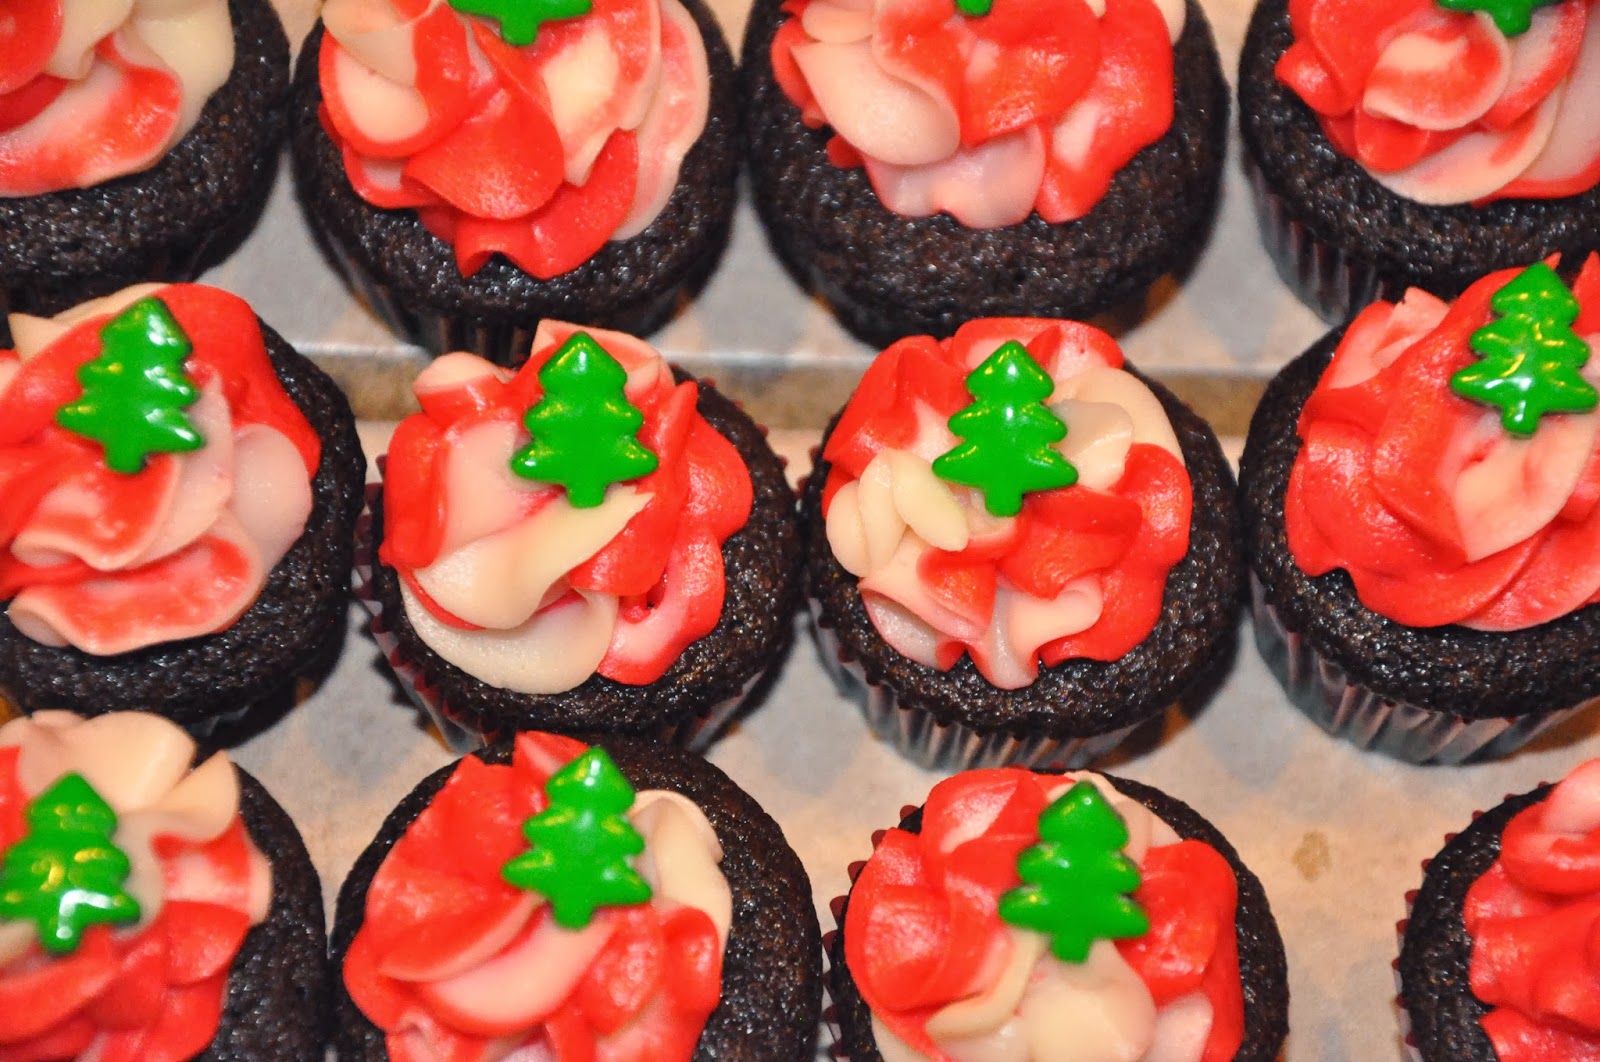
Christmas Cupcakes - Chocolate Peppermint Swirl, Holiday Spice with Eggnog Buttercream

So I'm not actually sure that Christmas cupcakes are a "thing."

Most people go with cookies, seasonal breads, or chocolates. But I like cake, y'all. Now cookies, candies, and breads, don't go getting all offended now, I love you too, but this year cake (cupcakes to be exact) won out as the gift of choice.  I made these for my colleagues and some friends, and they seemed to be a pretty solid success. I used a couple tried and true cake recipes for the cupcakes, and tweaked the buttercream to make these fit for consumption between Thanksgiving and New Year's.

Above, legions of cupcakes waiting to receive their frosting. If I wouldn't be mortified to show you what my kitchen looks like at this stage of the process, you could see that every surface that wasn't covered with sugar, frosting, piping tips, flour, and other such paraphernalia was covered with more cupcakes. Seriously. I made like 800 of these things. Well, maybe more like 160. But still. Lots.

As often happens, I couldn't choose between two flavors, and I don't believe my recipients should have to either, so I made both. Chocolate cupcakes with peppermint swirl buttercream, and Holiday Spice (which is totally just normal spice cake, but if you say holiday spice it makes people feel all Christmas-y and stuff) with eggnog buttercream. Both are simple to make (the piping of the peppermint frosting was the trickiest part) and so yummy. And making them in minis is good for the holiday season, where they will no doubt be sharing the dessert spotlight with numerous other treats vying for real estate in your stomach.

Whip some up this holiday season (or whenever really, it's not like peppermint is exclusive to Christmas, despite what Starbucks would have you believe), and enjoy time with family and friends.


********************
Chocolate Mini Cupcakes 
with Peppermint Swirl Buttercream
You can see my instructions here; it's the same chocolate cake I use to make cake pops.

Ingredients
2 cups flour
2 cups sugar
1/4 teaspoon salt
4 heaping tablespoons cocoa
2 sticks butter
1 cup boiling water
1/2 cup buttermilk
2 whole beaten eggs
1 teaspoon baking soda
1 teaspoon vanilla

Directions
Preheat oven to 350°
In a mixing bowl, combine the flour, sugar, and salt.In a saucepan, melt the butter. When butter is completely melted, add the cocoa.When butter and cocoa is well mixed, add the boiling water. Stir well. Allow this mixture to boil for 30 seconds, and then pull off the heat.
Pour the chocolate mixture into the flour mixture in the mixing bowl.Mix gently to let the mixture cool.In a separate measuring cup, combine the buttermilk, the beaten eggs, the vanilla, and the baking soda.Add the buttermilk mixture to the mixing bowl and mix until incorporated.
Spoon into mini baking cups (a little over half full) in a mini muffin pan. 
Bake 8-10 minutes or until toothpick comes out clean. Be careful, these are very easy to overbake as they are so tiny!


Peppermint Buttercream frosting

Ingredients

2 sticks (1/2 lb) unsalted butter
4-6 cups confectioner's sugar (more sugar means a stiffer frosting)
1/4 teaspoon salt
2-3 tablespoons heavy cream
2 teaspoons vanilla extract
1-3 teaspoons peppermint extract (to taste, this can be strong for some people)
red food color

Directions

In the large bowl of a mixer, with a paddle attachment, beat the butter for about 3 minutes.
Gradually add the sugar, 1 cup at a time, beating well after each addition. If you don't beat it in between, the frosting might end up grainy.
Add salt during one of the sugar additions.
Add two tablespoons of cream and vanilla, and beat well. Add cream to reach desired consistency (stiffer is better for piping).
Separate the frosting into halves in two bowls. To one bowl, add red food color until you reach the desired color (peppermint red). Add peppermint extract to red frosting 1/2 teaspoon at a time, tasting in between additions.
You could of course make all the frosting peppermint, or make the white peppermint, but I chose to make the red peppermint, and it's fun to have it swirled in with the white, which is still regular vanilla.


To pipe the swirled frosting, I made two small bags (12") filled with the red frosting, and two small bags filled with the white frosting. 


Snip the tips off all four bags, then slide them down into a large bag (at least 16") fitted with a piping tip (I used a Wilton 2D), ensuring that the openings of each small bag are all lined up as close as possible.


Then all you have to do is pipe away! It can be tricky to get it flowing at first (since you're working four bags at once), but as it warms up in your hands it will move smoothly. 


 They would be cute left like this, but I found these adorable candies at Williams Sonoma this year, and the little green trees look perfect perched on top of the swirly frosting.


********************


Holiday Spice Cupcakes with Eggnog Buttercream

Ingredients
2 1/2 cups flour
1 teaspoon baking powder
1 teaspoon baking soda
1 teaspoon salt
1 teaspoon ground cinnamon
1/2 teaspoon groung ginger
1/4 teaspoon ground nutmeg
1/4 teaspoon ground cloves
1/2 cup butter
1/2 cup brown sugar, firmly packed
1 cup granulated sugar
2 large eggs
1 teaspoon vanilla extract
1 1/4 cups buttermilk

Directions
Preheat oven to 350ºF.
Sift together the flour, baking powder, baking soda, salt, and spices. 
Cream butter in the bowl of your mixer. Add sugars, eggs, and vanilla. Beat at high speed for 4-5 minutes, or until the mixture becomes light and fluffy, scraping often.
Add dry ingredients alternately with buttermilk, using lowest speed of mixer (to avoid overmixing) until just combined.
Spoon into mini cupcake papers (a little over half full) in a mini muffin tin.
Bake 8-10 minutes (or until toothpick comes out clean). Be careful not to overbake these -  it's very easy to do, since they are so tiny.

Eggnog Buttercream


Ingredients

2 sticks (1/2 lb) unsalted butter
4-6 cups confectioner's sugar (more sugar means a stiffer frosting)
1/4 teaspoon salt
2-3 tablespoons heavy cream
2 teaspoons vanilla extract
3-6 tablespoons eggnog (to taste)...you could make your own, but I use store bought. It's yummy and it saves a ton of time
1/2 - 1 teaspoon ground cinnamon, plus extra for garnish

Directions
In the large bowl of a mixer, with a paddle attachment, beat the butter for about 3 minutes.
Gradually add the sugar, 1 cup at a time, beating well after each addition. If you don't beat it in between, the frosting might end up grainy.
Add salt during one of the sugar additions.
Add two tablespoons of cream and vanilla, and beat well. Add cream until just stiffer than desired consistency (stiffer is better for piping).

Add eggnog a tablespoon at a time until the taste is to your liking.


Pipe the frosting on using any tip you like (or heck, spread it on with a knife, dip 'em in there like chips and salsa, or smear it on with your fingers. Just try not to eat it all before it makes it to the cupcakes. It's good). I used a Wilton 1M, and managed to mostly pipe it onto cupcakes instead of directly into my mouth.
Sprinkle cinnamon onto the finished product. This is so pretty all by itself, but I did add some snowflake sprinkles to some of them, just to be extra festive.


 Here they are all packaged up ready to be delivered to work friends. These are fun, festive, and yummy. And easy, which means you can focus more time on friends, and family. After all, that's what's truly important. Much love, joy, and happiness for a wonderful Christmas and a happy New Year!

Saturday, September 7, 2013

A Girly Cake for a Baby Girl


Sugar and spice and everything nice. That is what little girls are made of.

Cake too. Especially when the top tier is spice cake, and the other two are white with raspberry and chocolate with more raspberry. And dark chocolate ganache. Smothered in cream cheese frosting and almond buttercream respectively.

This is one of my favorite cakes I have made. Ever. Like ever ever.

Why? Because of my emotional connection to it, and because of this:


And this:


And how the whole thing came together as a whole.

My best friend just became a Mommy for the first time this summer. We threw her a girly pink shower this spring, and I made this cake (duh). We wanted it to be cutesy but not kitschy, pink, but subtle, and mouthwateringly scrumptious. This was one of those designs that kind of percolated in the back of my mind for a couple weeks before all of a sudden becoming glaringly obvious as the perfect idea, and for once, execution almost identically matched my expectations.

The new Daddy-to-be's favorite cake is spice, so we made the little top tier spice cake (with cream cheese frosting) for him - it was set aside at the shower, and was taken home to be eaten later (since this was a traditional no-boys-allowed kind of shower). The other two tiers were those always crowd-pleasing white with raspberry filling and almond buttercream, and chocolate with raspberry and bittersweet ganache filling (also with almond buttercream).

Here they are all ready to be stacked and decorated. Spice cake front and center, and white and chocolate right behind.

The ombré look was pulled off with a combination of roses and fondant. The top and bottom layers were smothered in simple piped frosting roses (the "cheating" kind that I posted about a while back). The roses faded from a pretty pink at the bottom to white at the top (OK, almost white, but I was plumb out of clear vanilla extract).

The striped fondant tier in the middle was made to match the middle pink tone of the ombré for a continuous look top to bottom (or bottom to top...glass half full? The chicken or the egg?). The fondant tier was simple too. I made my homemade marshmallow fondant, first in white to cover the tier (which was, of course, frosted lightly to give the fondant something to cling to).


Then I mixed in some pink food coloring until it matched the pink I was going for, rolled it out, used a ruler and a pizza cutter to make the stripes, and "glued" them to the cake with a tiny bit of water.


When I was laying the stripes on the cake, I started on the top of the tier (not all the way to the center, since another tier was going to sit on top of it), and glued them down the sides before cutting off the excess even with the bottom of the tier. To space them evenly, do one, then another on the opposite side of the cake, and then do the ones halfway between those, etc. If you do one, and then another right next to it, and so on around the cake, you are likely to end up with too much or too little space when you get back to where you started.

For some cakes, I would decorate the tiers separately to avoid damaging finished tiers in the process. However, since this cake would be finished on the morning of the shower and the roses are pretty easy to smoosh (totally a word, even if spellcheck doesn't think so), I stacked it before I piped on the roses. The fondant tier was the only one completely finished before stacking. The others were only crumb-coated.

I loved the finished product. Still do. It was so so pretty and so so yummy. It will be hard to beat in the future.


This fun cake was a fun way to celebrate the imminent arrival of a sweet baby girl. Now that she is here, I am madly in love with her, and I am thrilled to be her "Auntie Katira."
Here we are on the fourth of July (2 weeks after she joined us in the world). Her outfit even matches her cake (that I'm sure she enjoyed in-utero)!


Sunday, April 28, 2013

Playing Catch Up - Project Snapshots


Often when I am working on a project, I will take plenty of pictures, compose a post, and diligently sit down to write it up within a reasonable amount of time.
Then there are all those other little things that I make in between. All the cakes, cupcakes, treats, snacks, or what-have-you that I don't take a bunch of pictures of, don't really have the time to write about on a Tuesday afternoon, or some that were even made pre-blog.

I don't think those projects deserve to get ignored or left all alone in the iPhoto archives, never to be drooled over, so here are some of my recent (or maybe not super recent) favorites. A series of mini-posts, if you will.

Colorful Bridal Shower "Margarita" Cake


This cake was for my best friend's bridal shower in 2010. They honeymooned in Mexico, so in anticipation of that, the shower was kinda Mexico themed. In a colorful, sangria, margarita, summery kind of way. The cake was white chocolate cake with raspberry filling for one tier, and coconut cake with lime curd filling for the other. I covered the layers with colorful fondant, cut little fondant limes slices, and garnished the whole thing with some glitter. Because glitter. You all know by now that if glitter is an option, then yes, glitter it will be.

50th Birthday Cupcakes


These were birthday cupcakes for my Mom's friend. Dark chocolate cupcakes with strawberry frosting. Sooooo-oooo-oooo good. The "50" toppers are hand-piped chocolate.

Golf Cupcakes


A going-away gift for a golf lover. These were very fun to make. Chocolate cupcakes (everyone likes chocolate cake), vanilla buttercream tinted green and piped with a grass tip, gumpaste golf balls, and little flags made from toothpicks and scrapbooking paper.

Football Cake Balls


This year my friends threw a Superbowl party. Naturally, I made something. Cake balls. Because cake balls are appropriate for literally every kind of event you could think of. I challenge you to think of something that you wouldn't bring cake balls to or eat cake balls at. (How many times can you say cake balls in a row without it being weird?)
These ones were chocolate shaped like footballs, covered with dark chocolate, and piped with little white laces.

Birthday Cake Balls


More cake balls! These ones were special for me, because they marked the first time that I shipped treats across the country...and they survived! A woman commissioned them for her brother's birthday. The recipient said they were still delicious and intact by the time they arrived in Wisconsin.
His sister said that his favorite color is blue, so I did some blue stripes, some with chocolate jimmies, and some with chopped pecans. A dozen of the cake balls were chocolate, and a dozen were red velvet. All were covered in a dark chocolate coating.

Puppy Birthday Cake


This cake was tons of fun. It was a commission from one of my students. Her mom asked if I could/would make her cake, and when I said that I would be delighted to, her daughter drew me a design. The design included yellow, red, turquoise, purple, a puppy, and writing. Kids should design all cakes; they have the best sense of fun. Anyhow, this is how it turned out.
The sheet cake part is lemon with lemon curd filling and vanilla buttercream, and the puppy face on top is chocolate cake with chocolate buttercream.
She loved it. And so did I. From now on, if it is possible for a kid to design a birthday cake, go with it.


Sunday, March 17, 2013

Top O' The Mornin'! - Irish Car Bomb Mini-Cupcakes


Pop quiz: Put the following three things together, and what do you get?


If your answer was "An Irish Car Bomb!" you are partially correct.

Another acceptable response would be cupcakes. Cuz, you know, pretty much anything is good in cupcake form. Anything edible anyway. You know what I meant.

One of my friends threw a St. Patrick's Day party this weekend (yay!), and she said we could bring treats (yay again!). The party was great. She made people wear green or they couldn't come in (I think we might be kindred spirits). I love themed parties, and I really love themed treats. So I made some. Themed treats, that is.
These ones:


I'd like to claim that I'm growing up, but I do still occasionally enjoy an Irish Car Bomb from time to time, so I made these cupcakes as a tribute to the drink that most people drink once a year to celebrate our dear friend St. Patrick.

They start with a wee Guinness chocolate cupcake, topped with Irish whiskey ganache and Bailey's buttercream. And for flair, even wee-er green shamrocks with glitter. Because why not? Glitter's super festive.

These were easy, but time consuming to make, but you could easily cut down on the time by not doing the shamrocks or not making 80 of them.

Lá Fhéile Pádraig Sona Daoibh!

( I apologize in advance if I offend anyone who actually speaks Gaelic, since I am not entirely sure that actually says Happy St. Patricks' Day)

*****************************************************************************

Irish Car Bomb Cupcakes

Guinness Chocolate Cupcakes 

(Makes about 80...ish mini cupcakes)

Ingredients

CAKE

2 cups flour
2 cups sugar
1/4 teaspoon salt
2 sticks (1 cup) butter
4 heaping tablespoons cocoa powder
1 cup Guinness 
1/2 cup buttermilk (you can make your own with a little milk and lemon juice)
2 whole beaten eggs
1 teaspoon baking soda
1 teaspoon vanilla

GANACHE

8 ounces bittersweet chocolate
2/3 cup heavy whipping cream
2 tablespoons butter
1-2 teaspoons Irish whiskey (to taste)

BAILEY'S BUTTERCREAM

2 sticks (1 cup) butter
4 cups confectioner's sugar
2 teaspoons vanilla
3-4 tablespoons Bailey's Irish Cream

SHAMROCK TOPPERS

green candy melts
white candy melts (optional)
green disco dust


Directions

For the cupcakes:

Preheat oven t350°. Line mini muffin tin with cupcake liners. I used gold foil ones like these, cuz, you know, pot o' gold and all that. It was adorable.

Combine flour, sugar, and salt in a mixing bowl. 

Melt butter over medium-low heat in a saucepan. When melted, add cocoa powder (make them really heaping, because it's chocolate, and chocolate is so good. Whisk together the butter and cocoa powder until smooth. 
Add Guinness. Let this heat through. It'll get pretty bubbly, but does not need to come to a rolling boil.
Take chocolate/butter/beer mixture off the heat and pour it into the flour/sugar mixture in the mixing bowl. Briefly mix gently to let the mixture cool.

In a small bowl or measuring cup, mix together the buttermilk, beaten eggs, baking soda, and vanilla.
Add this to the chocolate mixture and combine. Don't overmix. And don't add it when the chocolate is still hot, or you risk making chocolate scrambled eggs.

Spoon mixture into mini-cupcake liners and bake for 12 minutes (or until tops spring back when touched, cake tester comes out clean, etc. etc.).


For the ganache:

Chop chocolate into small pieces and put in a medium bowl.

Heat cream gently in a double boiler (you don't need an actual double boiler. A metal bowl over simmering water does the exact same thing). 

Pour cream over chocolate and mix until smooth. Add butter. Mix until smooth again. 

Add whiskey. I recommend if you're not a huge whiskey drinker that you add it little by little until you like the taste.

Dip the little cupcakes in the ganache and then let it set. It will set up nicely without putting them in the fridge, but you do need to let them set before you frost them so the frosting doesn't just slide off the top.

(I dipped these instead of filling them because they're so teeny. If you made regular sized cupcakes, you could easily inject this ganache into the cakes, and that would be delish as well.)


For the frosting:

In a mixer, beat the butter until smooth and fluffy. Add the confectioner's sugar in 1/2 or 1 cup portions, beating well in between (this makes it nice and fluffy and keeps it from being grainy or gritty).
Add vanilla and Bailey's and beat until smooth and creamy.

Frost in your preferred manner. I used a Wilton #21 tip and swirled it on. 


For the toppers:

Melt green candy melts in a small bowl or glass measuring cup. I added a few white ones to lighten the green up just a titch. 
To melt, microwave the melts 30 seconds at a time, stirring in between, until smooth. The reason you're melting them in short bursts is so that they don't get overheated. You really only need them to be just melted. They will look solid until you stir them.
Anyhow, once they are melted, pour them into a piping bag fitted with a Wilton #1 tip.
Pipe out the shamrocks. They are just four little teardrop shapes that touch in the middle, and then a stem on the bottom.


Add a sprinkle (my preference is a generous sprinkle, because...glitter) of disco dust while they are still wet. 


Allow to dry, and then add to the top of each cupcake. Just nestle 'em right in there.


And there you have it. Eat, drink, and be Irish!


Look at that. Look at that chocolate, shiny, shiny ganache, and creamy Bailey's goodness. And the glitter. Ach! 'Tis delicious they look, to be sure.

Éirinn go Brách! Enjoy!

Saturday, May 26, 2012

"Cinco de Graduation-Derby" Cake


My sister Hillory is a rock star. This is her (well, if you want to get technical, this is me and her).


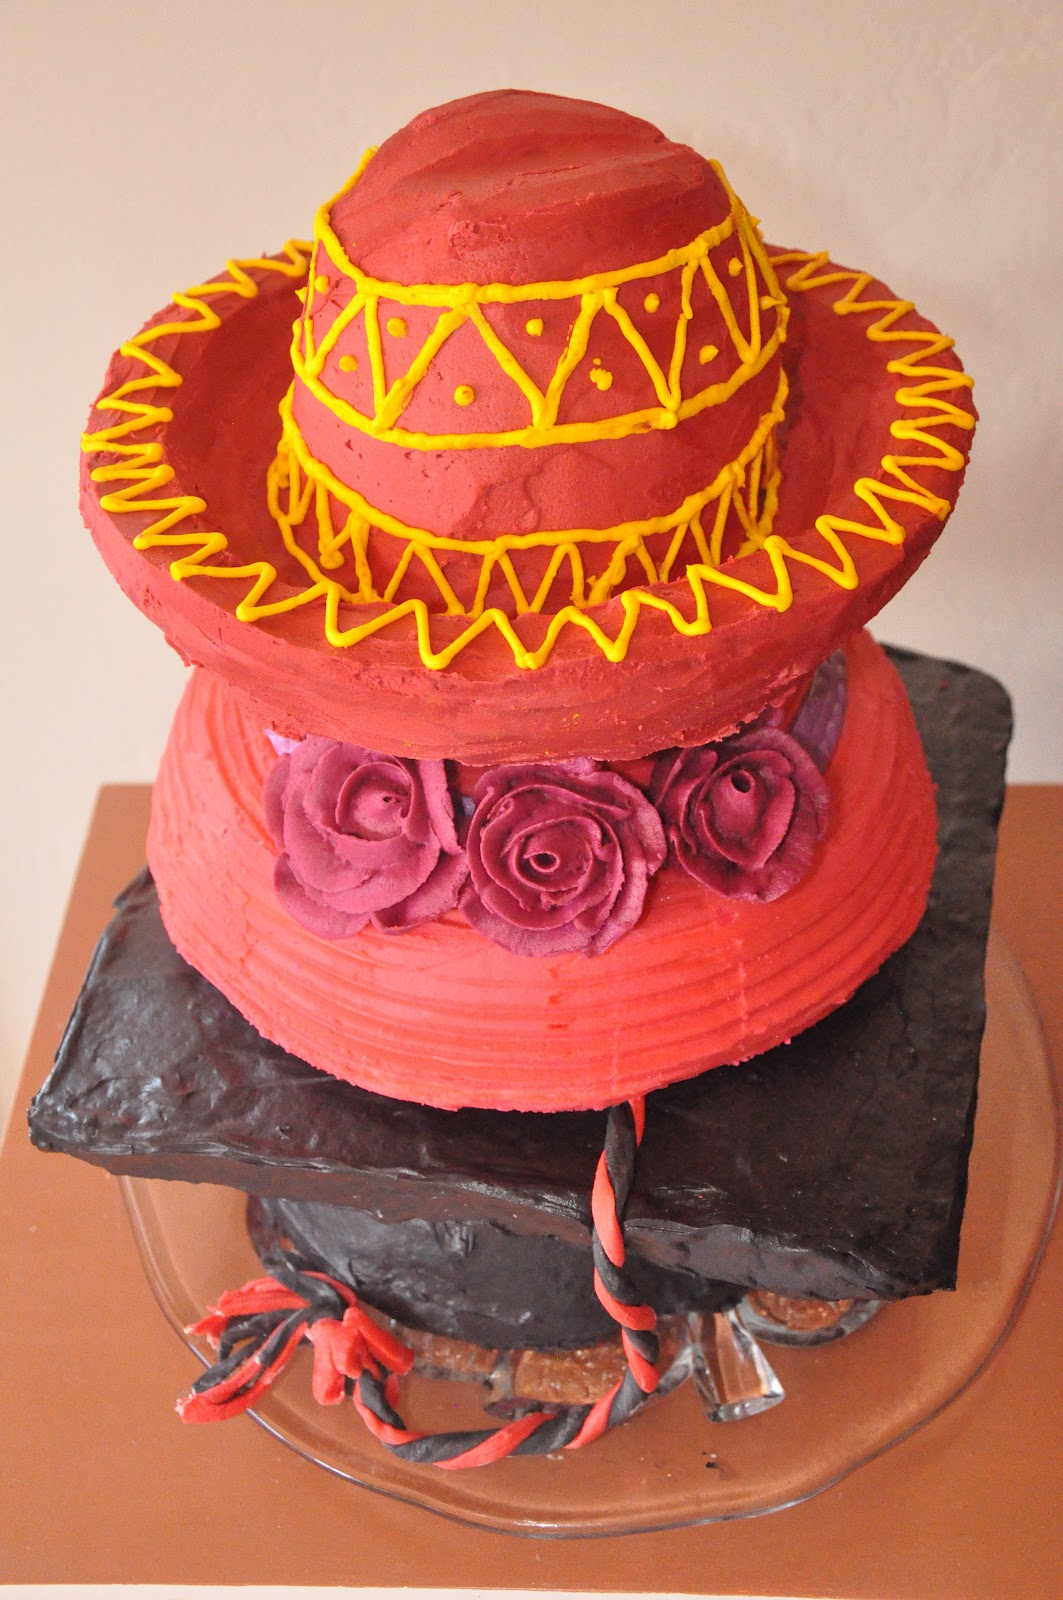
Before I started rambling about frosting and piping and trying to drive cakes three hours over a high-altitude mountain pass, I wanted to put that out there. She is my best friend in the whole world, bar none. She is smart, beautiful, funny, and talented. This cake was made to honor her and her friends' graduation from college. However, the twist this time is that, in addition to being Hillory's graduation, it was also Derby Day and Cinco de Mayo. Two days that I think should not be neglected in the celebration department (or at least taken advantage of as an excuse to eat cake). Hillory had the awesome idea to incorporate these days into the cake by doing three different hats: a graduation cap, a derby hat, and a sombrero.
Challenge. Accepted.

As I think I have mentioned before, I am a firm believer in taste first, design second. I think cakes should be beautiful and whimsical, but the whole point of a cake is to eat it, so the flavors need to be there, and it needs to be scrumptious. This cake presented me with a great opportunity to have some fun with flavor. The bottom was red velvet, so that when the cake was cut, it would represent the school colors (red cake, black frosting). The middle tier was white chocolate cake with raspberry filling (by request). The top tier was coconut cake with lime curd filling (in honor of Cinco de Mayo).

To give the hats shape, I made the brims of the grad cap and the sombrero out of rice krispie treats (the derby hat is all cake).

I used this Red Velvet Cake recipe, and this Cream Cheese Frosting recipe for the graduation cap cake.
I made two layers, filled them with cream cheese frosting between the layers, and then carved the cake into a rounded cap shape. I colored the rest of the cream cheese frosting black. Now, I have to tell you, this is not the most fun activity in the world. It takes a lot of color, and nobody wants their frosting to taste like food dye. So, I dyed the frosting dark green first, and then used a whole lotta black. It will darken after a while, so let it sit for a couple of hours in the fridge. Oh, and black food dye stains stuff, so wear an apron and try not to get it all over everything in the kitchen (like I do). You might want to wear gloves if you don't want your fingernails to be purple on the edges for about a week. Me, I think it added a little something to my graduation outfit. And every other outfit I wore for the next eight days.
For the mortarboard, I made rice krispie treats and pressed them into a square about an inch thick. Even though I let it sit for a couple hours, its size and thinness meant that I needed to support it with some cardboard. I frosted this and attached it to the putting-on-your-head part (is there a name for that? Isn't it called the crown or something?) with wooden skewers. The tassel was made out of fondant (homemade marshmallow fondant, to be specific - I will include the recipe in another post).

The Kentucky Derby Hat was White Chocolate Cake with a raspberry filling, from the recipe included below. I stacked the tiers (with buttercream and raspberry filling in between), and then carved the cake into a hat-ish shape (albeit a hat that I thought might be sturdy enough to hold up another one...). I crumb-coated it with pink frosting (so that another color, like white, wouldn't show through in the final coat) and then stuck it in the fridge to set for a little while. While it was chilling, I tinted some more buttercream purple and piped out some roses (there are tons of great tutorials out there on youtube and such for those of you who are new to this...) to decorate the hat. It's less tricky than I used to think, and if I can do it, you can too. Here they are on the cake...


After the final coat of frosting, I used one of these side-design-thingamajigs to put a little stripy effect on the hat (I'm planning on coming out with a cake term dictionary any day now). I rolled out a hat band with some fondant dyed purple, and wrapped that around the hat. The flowers were to be transported to Gunnison separately so they wouldn't slip off the cake in the car.


As for the sombrero...this one was fun. Probably one of my favorite cakes to make so far. As I mentioned before, the brim was made out of rice krispie treats.
Oh wait a second. Here is where I apologize for not taking pictures of the process. Again. I'm working on it, I swear. With that out of the way... we were talking about rice krispie treats. Right. So anyway, I pressed these ones into a pie dish so that they would have a brim-like shape. It worked! Gotta love that. It was supported underneath with a piece of cardboard, just in case. The crown (see, with the using of the correct term? Bet you liked that) is made of cake. Coconut cake with lime curd filling (recipe below). So Good. The lime curd is sour, and the coconut cake is dense and moist. I carved it into what I thought resembled a sombrero crown (please don't google images of a sombrero right now, because as it turns out, I should have done that first, although I guess it's close enough). You guessed the next steps, so say them with me now...crumb coat, refrigerate, final coat of frosting, decorate. Yay! The decorating of this one was fun, because I totally did not consult my plans, but rather filled up a piping bag with yellow frosting, and, using a small round tip, kinda just went for it.
Here is the final result. Fun, no?


I was pleased with how the whole thing turned out (and especially the fact that it didn't fall over/melt/lack taste, etc.). And I also want to say that the transport of these cakes was an experience unto itself. My sister went to college in a town about 2 1/2 to 3 hours away from where I live, depending on who's driving and how often she gets stopped to get speeding tickets. This drive also includes a couple dozen high-altitude mountain passes (or three, but whatever). I drive a Jeep with questionable shocks (or at least if feels that way...let's just say it's not a Rolls). Oh, and did I mention that I had to do this at 2:00 in the morning? Don't ask. Normally I would be sleepy driving at 2am, but the adrenaline surging through my veins every time I drove over each piece of gravel on the road did the trick. All three tiers survived the journey, and all three tiers survived a night and a morning in a college house with no supervision (I didn't even see any finger marks in the frosting).


Congratulations to my beautiful sister!


Recipes

White Chocolate Cake with Raspberry Filling

(adapted from this recipe)

Ingredients

2 1/2 cups all purpose flour
1 teaspoon baking soda
1/2 teaspoon baking powder
1/2 teaspoon salt
6 ounces white chocolate, chopped
1/2 cup hot water
1 cup butter, softened
1 1/2 cups white sugar
3 eggs, room temperature
1 cup buttermilk, at room temperature

Directions

Preheat oven to 350°
Sift together the flour, baking soda, baking powder, and salt.
In a small saucepan, melt together the chocolate and the water on low heat (this is not a double boiler situation, the chocolate and the water get mixed together). Melt and stir until smooth, and then cool to room temperature.
In another bowl (like the bowl of your mixer), cream together the butter and the sugar until light and fluffy. Then add the eggs, one at a time, beating in between each addition.
Stir in the flour mixture and the buttermilk in alternating batches, starting and ending with the flour mixture.
Gently mix in the white chocolate/water mixture.
Pour batter into 2 round 9-inch pans, prepared with baking spray.
Bake for 3-35 minutes, or until a toothpick comes out clean when inserted in the center of the cake.

Buttercream frosting

Ingredients

2 sticks (1/2 lb) unsalted butter
4-6 cups confectioner's sugar (more sugar means a stiffer frosting)
1/4 teaspoon salt
2-3 tablespoons heavy cream
2 teaspoons vanilla extract

Directions

In the large bowl of a mixer, with a paddle attachment, beat the butter for about 3 minutes.
Gradually add the sugar, 1 cup at a time, beating well after each addition. If you don't beat it in between, the frosting might end up grainy.
Add salt during one of the sugar additions.
Add two tablespoons of cream and vanilla, and beat well. Add cream to reach desired consistency (stiffer is better for piping).

**Note: I quadrupled this for this particular cake.

Raspberry Filling

There are a couple ways to do this. You can use raspberry jam on its own or with buttercream, or you can blend raspberries (fresh or frozen) into some buttercream to make a fruity filling. Actually, it would be more accurate to say that you could do this any way you want. I blended some raspberries into frosting, and also spread some jam on the cake before adding the filling.

Coconut Cake

(adapted from this recipe by the Barefoot Contessa)

Ingredients

3 sticks (3/4 lb) unsalted butter, at room temperature
2 cups sugar
5 eggs, at room temperature
1 1/2 teaspoons vanilla extract
1 1/2 teaspoons almond extract
3 cups all purpose flour
1 teaspoon baking powder
1/2 teaspoon baking soda
1/2 teaspoon salt
1 cup milk
4 ounces sweetened shredded coconut

Directions

Preheat the oven to 350°F
Prepare 2 round 9-inch pans with baking spray (or butter and flour and parchment paper).
Sift together flour, baking powder, baking soda, and salt in a large bowl.
In the bowl of your mixer with the paddle attachment, cream the butter and sugar on a medium speed until light and fluffy (about 3-5 minutes).
Add the eggs one at a time, beating and scraping the bowl in between each addition.
Add the vanilla and almond extracts and mix well.
Don't be worried if the mixture looks curdled here. It always does, there's nothing wrong with it.
With the mixer on low speed, add the flour mixture and the milk in 3 alternating batches, starting and ending with the flour. Don't overmix here, you want to mix it just enough to combine all the ingredients.
Gently fold in the coconut with a spatula.
Pour the batter into the prepared pans. Bake for 45-55 minutes, or until top is lightly golden and a toothpick comes out clean.

Lime Curd

(from here)

Ingredients

1 cup granulated sugar
3 large eggs
1 cup fresh lime juice
the zest of 3 large limes
1 stick (1/4 cup) butter, melted

Directions

**Note: This makes a lot of lime curd. But the extra is so yummy...on ice cream, extra cake, or...a spoon.

Put sugar, butter, and eggs in a medium to large sized microwave safe bowl.
Whisk well until smooth.
Stir in lime juice and zest.
Microwave on high for 2 minutes.
Stir and cook on high for 1 minute.
Repeat the last step (stir and cook on high for 1 min) until the mixture reaches 196°F, or is thick enough to coat the back of a spoon.
When finished, cover the mixture with plastic wrap placed directly on the surface of the lime curd.
Refrigerate at least a couple hours to set.
You can mix this with buttercream or spread it directly on the cake. Or eat it off a spoon. Your call.


Here we are again. At her graduation. Goodness gracious, she's pretty.