

My sister Hillory is a rock star. This is her (well, if you want to get technical, this is me and her).

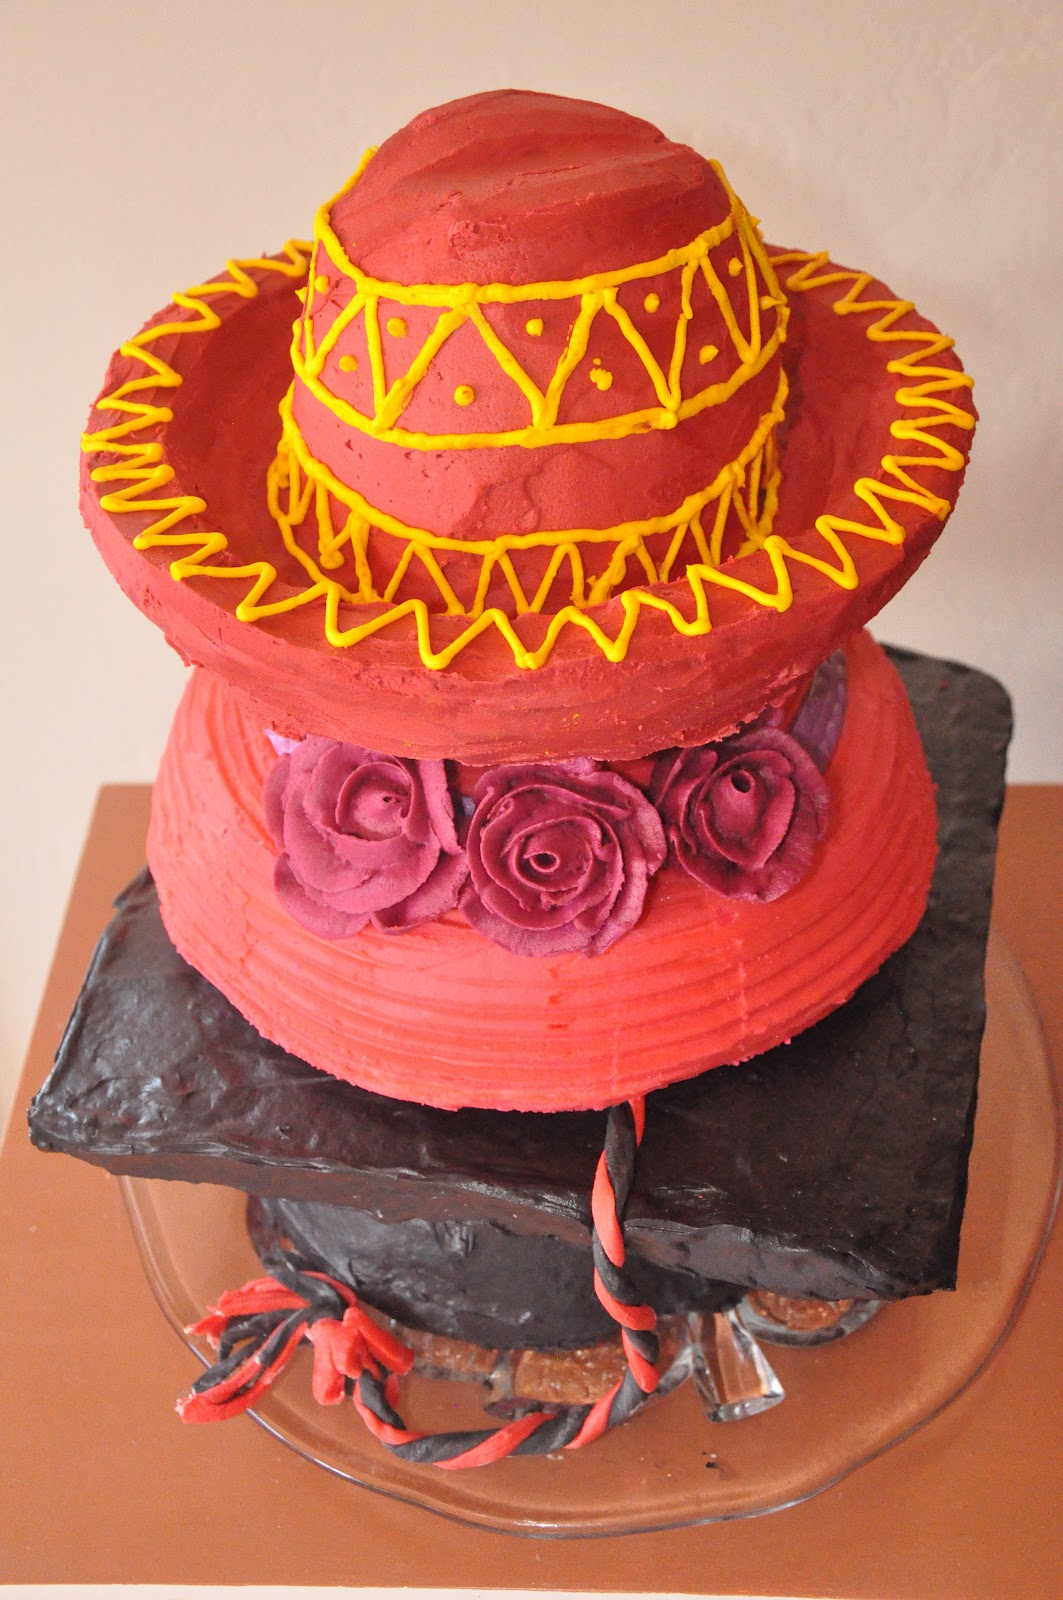
Before I started rambling about frosting and piping and trying to drive cakes three hours over a high-altitude mountain pass, I wanted to put that out there. She is my best friend in the whole world, bar none. She is smart, beautiful, funny, and talented. This cake was made to honor her and her friends' graduation from college. However, the twist this time is that, in addition to being Hillory's graduation, it was also Derby Day and Cinco de Mayo. Two days that I think should not be neglected in the celebration department (or at least taken advantage of as an excuse to eat cake). Hillory had the awesome idea to incorporate these days into the cake by doing three different hats: a graduation cap, a derby hat, and a sombrero.
Challenge. Accepted.
As I think I have mentioned before, I am a firm believer in taste first, design second. I think cakes should be beautiful and whimsical, but the whole point of a cake is to eat it, so the flavors need to be there, and it needs to be scrumptious. This cake presented me with a great opportunity to have some fun with flavor. The bottom was red velvet, so that when the cake was cut, it would represent the school colors (red cake, black frosting). The middle tier was white chocolate cake with raspberry filling (by request). The top tier was coconut cake with lime curd filling (in honor of Cinco de Mayo).
To give the hats shape, I made the brims of the grad cap and the sombrero out of rice krispie treats (the derby hat is all cake).
I used this Red Velvet Cake recipe, and this Cream Cheese Frosting recipe for the graduation cap cake.
I made two layers, filled them with cream cheese frosting between the layers, and then carved the cake into a rounded cap shape. I colored the rest of the cream cheese frosting black. Now, I have to tell you, this is not the most fun activity in the world. It takes a lot of color, and nobody wants their frosting to taste like food dye. So, I dyed the frosting dark green first, and then used a whole lotta black. It will darken after a while, so let it sit for a couple of hours in the fridge. Oh, and black food dye stains stuff, so wear an apron and try not to get it all over everything in the kitchen (like I do). You might want to wear gloves if you don't want your fingernails to be purple on the edges for about a week. Me, I think it added a little something to my graduation outfit. And every other outfit I wore for the next eight days.
For the mortarboard, I made rice krispie treats and pressed them into a square about an inch thick. Even though I let it sit for a couple hours, its size and thinness meant that I needed to support it with some cardboard. I frosted this and attached it to the putting-on-your-head part (is there a name for that? Isn't it called the crown or something?) with wooden skewers. The tassel was made out of fondant (homemade marshmallow fondant, to be specific - I will include the recipe in another post).
The Kentucky Derby Hat was White Chocolate Cake with a raspberry filling, from the recipe included below. I stacked the tiers (with buttercream and raspberry filling in between), and then carved the cake into a hat-ish shape (albeit a hat that I thought might be sturdy enough to hold up another one...). I crumb-coated it with pink frosting (so that another color, like white, wouldn't show through in the final coat) and then stuck it in the fridge to set for a little while. While it was chilling, I tinted some more buttercream purple and piped out some roses (there are tons of great tutorials out there on youtube and such for those of you who are new to this...) to decorate the hat. It's less tricky than I used to think, and if I can do it, you can too. Here they are on the cake...

After the final coat of frosting, I used one of these side-design-thingamajigs to put a little stripy effect on the hat (I'm planning on coming out with a cake term dictionary any day now). I rolled out a hat band with some fondant dyed purple, and wrapped that around the hat. The flowers were to be transported to Gunnison separately so they wouldn't slip off the cake in the car.

As for the sombrero...this one was fun. Probably one of my favorite cakes to make so far. As I mentioned before, the brim was made out of rice krispie treats.
Oh wait a second. Here is where I apologize for not taking pictures of the process. Again. I'm working on it, I swear. With that out of the way... we were talking about rice krispie treats. Right. So anyway, I pressed these ones into a pie dish so that they would have a brim-like shape. It worked! Gotta love that. It was supported underneath with a piece of cardboard, just in case. The crown (see, with the using of the correct term? Bet you liked that) is made of cake. Coconut cake with lime curd filling (recipe below). So Good. The lime curd is sour, and the coconut cake is dense and moist. I carved it into what I thought resembled a sombrero crown (please don't google images of a sombrero right now, because as it turns out, I should have done that first, although I guess it's close enough). You guessed the next steps, so say them with me now...crumb coat, refrigerate, final coat of frosting, decorate. Yay! The decorating of this one was fun, because I totally did not consult my plans, but rather filled up a piping bag with yellow frosting, and, using a small round tip, kinda just went for it.
Here is the final result. Fun, no?

I was pleased with how the whole thing turned out (and especially the fact that it didn't fall over/melt/lack taste, etc.). And I also want to say that the transport of these cakes was an experience unto itself. My sister went to college in a town about 2 1/2 to 3 hours away from where I live, depending on who's driving and how often she gets stopped to get speeding tickets. This drive also includes a couple dozen high-altitude mountain passes (or three, but whatever). I drive a Jeep with questionable shocks (or at least if feels that way...let's just say it's not a Rolls). Oh, and did I mention that I had to do this at 2:00 in the morning? Don't ask. Normally I would be sleepy driving at 2am, but the adrenaline surging through my veins every time I drove over each piece of gravel on the road did the trick. All three tiers survived the journey, and all three tiers survived a night and a morning in a college house with no supervision (I didn't even see any finger marks in the frosting).
Congratulations to my beautiful sister!

Recipes
White Chocolate Cake with Raspberry Filling
(adapted from this recipe)Ingredients
2 1/2 cups all purpose flour1 teaspoon baking soda
1/2 teaspoon baking powder
1/2 teaspoon salt
6 ounces white chocolate, chopped
1/2 cup hot water
1 cup butter, softened
1 1/2 cups white sugar
3 eggs, room temperature
1 cup buttermilk, at room temperature
Directions
Preheat oven to 350°Sift together the flour, baking soda, baking powder, and salt.
In a small saucepan, melt together the chocolate and the water on low heat (this is not a double boiler situation, the chocolate and the water get mixed together). Melt and stir until smooth, and then cool to room temperature.
In another bowl (like the bowl of your mixer), cream together the butter and the sugar until light and fluffy. Then add the eggs, one at a time, beating in between each addition.
Stir in the flour mixture and the buttermilk in alternating batches, starting and ending with the flour mixture.
Gently mix in the white chocolate/water mixture.
Pour batter into 2 round 9-inch pans, prepared with baking spray.
Bake for 3-35 minutes, or until a toothpick comes out clean when inserted in the center of the cake.
Buttercream frosting
Ingredients
2 sticks (1/2 lb) unsalted butter4-6 cups confectioner's sugar (more sugar means a stiffer frosting)
1/4 teaspoon salt
2-3 tablespoons heavy cream
2 teaspoons vanilla extract
Directions
In the large bowl of a mixer, with a paddle attachment, beat the butter for about 3 minutes.Gradually add the sugar, 1 cup at a time, beating well after each addition. If you don't beat it in between, the frosting might end up grainy.
Add salt during one of the sugar additions.
Add two tablespoons of cream and vanilla, and beat well. Add cream to reach desired consistency (stiffer is better for piping).
**Note: I quadrupled this for this particular cake.
Raspberry Filling
There are a couple ways to do this. You can use raspberry jam on its own or with buttercream, or you can blend raspberries (fresh or frozen) into some buttercream to make a fruity filling. Actually, it would be more accurate to say that you could do this any way you want. I blended some raspberries into frosting, and also spread some jam on the cake before adding the filling.Coconut Cake
(adapted from this recipe by the Barefoot Contessa)Ingredients
3 sticks (3/4 lb) unsalted butter, at room temperature2 cups sugar
5 eggs, at room temperature
1 1/2 teaspoons vanilla extract
1 1/2 teaspoons almond extract
3 cups all purpose flour
1 teaspoon baking powder
1/2 teaspoon baking soda
1/2 teaspoon salt
1 cup milk
4 ounces sweetened shredded coconut
Directions
Preheat the oven to 350°FPrepare 2 round 9-inch pans with baking spray (or butter and flour and parchment paper).
Sift together flour, baking powder, baking soda, and salt in a large bowl.
In the bowl of your mixer with the paddle attachment, cream the butter and sugar on a medium speed until light and fluffy (about 3-5 minutes).
Add the eggs one at a time, beating and scraping the bowl in between each addition.
Add the vanilla and almond extracts and mix well.
Don't be worried if the mixture looks curdled here. It always does, there's nothing wrong with it.
With the mixer on low speed, add the flour mixture and the milk in 3 alternating batches, starting and ending with the flour. Don't overmix here, you want to mix it just enough to combine all the ingredients.
Gently fold in the coconut with a spatula.
Pour the batter into the prepared pans. Bake for 45-55 minutes, or until top is lightly golden and a toothpick comes out clean.
Lime Curd
(from here)Ingredients
1 cup granulated sugar3 large eggs
1 cup fresh lime juice
the zest of 3 large limes
1 stick (1/4 cup) butter, melted
Directions
**Note: This makes a lot of lime curd. But the extra is so yummy...on ice cream, extra cake, or...a spoon.Put sugar, butter, and eggs in a medium to large sized microwave safe bowl.
Whisk well until smooth.
Stir in lime juice and zest.
Microwave on high for 2 minutes.
Stir and cook on high for 1 minute.
Repeat the last step (stir and cook on high for 1 min) until the mixture reaches 196°F, or is thick enough to coat the back of a spoon.
When finished, cover the mixture with plastic wrap placed directly on the surface of the lime curd.
Refrigerate at least a couple hours to set.
You can mix this with buttercream or spread it directly on the cake. Or eat it off a spoon. Your call.
Here we are again. At her graduation. Goodness gracious, she's pretty.


